Search This Blog

Showing posts with label Onions. Show all posts

Saturday, 21 September 2013

Green Tomato Chutney

 
Green tomato chutney has been made and the preserving pan has been put away for another year… or maybe not.** I’ve already made Tomato and Cranberry Relish, Red Onion Marmalade and Nectarine Chutney and I am now all chutneyed out! (I’m not sure 'chutneyed' is a word but you know what I mean…)

I thought I’d already finished for this year but the weather suddenly turned cold and wet almost overnight – summer was gone and there was no way all the green tomatoes in the garden were going to ripen. I brought them indoors to warm them up a bit but some of the larger ones were stubbornly resisting turning red so, after retrieving my spare jam jars from the back of the cupboard, I set to once again and started chopping. It’s been a really good year for our onions and apples, happily, so I was able to make good use of those, too.

I always feel so chuffed when I’m able to use our own produce – I'm pathetically easily pleased. I spiced this one up a bit more than usual – green tomatoes don’t have a lot of flavour so they need all the help they can get, poor things.

**I may have lied when I said the preserving pan has been put away… Our apple tree is weighed down with fruit and I don’t intend to waste any of it. Watch this space.

850g green tomatoes
250g onions (after peeling)
250g apples, peeled and cored
125g dates (use raisins if you like)
4 cloves garlic
30g fresh ginger root
1tsp ground cumin
1tsp ground coriander
1tsp salt
½ tsp cayenne
½ tsp chilli flakes
300g light muscovado sugar
350ml white wine vinegar

Halve the tomatoes, cut out the core and discard, then roughly chop; chop the apples, onions and dates a bit more finely than the tomatoes then put the whole lot into a large wide pan.

Blitz the garlic, ginger, cumin, coriander and salt with a couple of tablespoons of the measured vinegar in the blender then add to the pan along with the cayenne, chilli flakes, sugar and the rest of the vinegar. Stir well, bring to the boil then turn the heat down a bit and let it bubble for about an hour or so until nice and thick.

Draw a wooden spoon across the bottom of the pan and if the channel doesn’t fill up with liquid it’s ready to pot up into hot sterilised jars.

Allow to mature for 4 – 6 weeks before eating.

Makes 7 190g jars.

Sunday, 7 July 2013

Warm Roast Vegetable Salad with Feta

This was our dinner on Friday night – it perfectly fitted my Wimbledon food criteria... quick, easy and convenient to eat. I’d spent most of the day watching tennis (Andy Murray’s match was a real nail biter!) and could barely drag myself away from the TV so there was no way I was planning to do anything too tricky foodwise.

I had the laptop, with the BBC's live coverage, on the breakfast bar while I was in the kitchen so that I didn’t miss a ball; I will say that chopping veg is a somewhat hazardous operation, though, whilst watching Andy at set-point to level the match - I don't recommend it at all!

This made quite a decent amount of roast veg and there was some left over so I added the remainder to some garden grown salad leaves, beetroot and tomatoes for lunch yesterday - very nice indeed. It's also good stirred through some couscous along with a couple of spoonsful of dressing to moisten.

......and so we come to today’s match; at 2pm – the Wimbledon Men's Singles final. Ooo-er…missus! I have spent almost my entire life wanting this; will today be the day I’ve been waiting half a century for? I bloody hope so! C’mon Andy!!

Update:
Since I put this post on this morning Andy Murray has won the Men's Wimbledon Singles title!! Magnificent, astonishing, stupendous and every other superlative you can think of...! I never thought it would happen in my lifetime, so I am a very happy camper indeed. There wasn't a dry eye in the Simply Veggie household...it was a privilege and a pleasure to watch.

2 red onions
1 small aubergine
2 Romano red peppers
150g mushrooms
1 medium sweet potato
2 tbsp olive oil
black pepper
few sprigs of fresh rosemary
150g feta cheese

1tsp Dijon mustard
1tsp runny honey
1tbsp sherry vinegar
1tbsp olive oil
1tbsp walnut oil

a few snipped chives

Peel the onions and cut them through the root into eighths; chop the aubergine and peppers into chunks about 2 or 3cm square; peel and chop the sweet potato into chunky pieces; if the mushrooms are small leave them whole or halve them if larger. Put all the veg into a large plastic freezer bag (saves on washing up!) along with the olive oil, rosemary and a few grinds of black pepper; hold the top of the bag tightly shut and shake until all the veg are coated in oil.

Tip the vegetables into a large baking tin or two and roast at 200C for 30 minutes until cooked through and starting to char a bit at the edges.

Put the dressing ingredients into a small jam jar and shake like billy-o until the mixture emulsifies.

Once the roast veg are cooked, discard the rosemary and arrange a goodly amount of the veg on two plates; top with the crumbled feta and a sprinkling of snipped chives. Drizzle over a little dressing and serve with crusty bread.

Saturday, 5 January 2013

Butternut and Carrot Soup

Before Christmas I put all the fruit and veg I’d bought in a cardboard box and popped it outside in the garage to give me more fridge space. I think I may have had a brainstorm because I seem to have overbought somewhat….

We’re still ploughing our way through a small mountain of clementines and quite why I bought so many carrots is anybody’s guess, but I still seem to have masses of them; don’t even ask what I was going to do with the butternut squash I discovered because I can’t remember! Thank goodness root veg keep so well in a cold place.

My usual way of using up a glut of veg is to make soup and that’s exactly what I did a couple of days ago. It was actually quite nice to have something simple after all the excesses of the festive season.

1 medium butternut squash
400g carrots
1 large red onion
1tbsp olive oil
1.5 litres vegetable stock
good pinch of dried chilli flakes
½ tsp dried thyme
50g red lentils
a few snipped chives


Peel and deseed the squash then peel the carrots and chop both into 3cm chunks; peel the onion and slice it into eighths through the root end. Put all the veg into a large plastic bag together with the olive oil, hold the top tightly closed and shake well to distribute the oil; put the veg in a single layer on a large baking tray and roast at 200C for 30 minutes until tender and just beginning to char at the edges.

Scoop the veg into a large saucepan and add the lentils, stock, thyme and chilli flakes; stir well, bring to the boil and simmer for 15-20 minutes until the lentils are completely soft.

Blitz with a stick blender until smooth.

(I was going to put a spoonful of crème fraiche on this but in the event I decided to go with a sprinkle of snipped chives…better for the waistline!)

Makes 6 good portions

Saturday, 20 October 2012

Sausage and Lentil Hotpot

I used to really like winter but I’m starting to change my mind; I’m not looking forward at all to the grey days and the long dark evenings to come, although I do like a nice cold frosty morning with the sun shining through the trees. The weather’s been very autumnal lately – grey and overcast with intermittent rain; you know the type of thing…there’s a break in the clouds so you decide to go for a walk but, by the time you’ve grabbed a coat and a pair of shoes, it’s raining again…grr!

My cold is still dragging on (maybe this year I’ll just have one very, very long cold which will last the entire winter!) so I’m still in comfort food mode.

I was going to do sausage and mash last night but Mr Simply Veg had a fancy for garlic bread, which rather negated the need for mash. Quite clearly something with a sauce was needed, to allow bread’s mopping up tendencies to have full rein, and this tomatoey, lentilly affair fitted the bill very nicely, I thought. I also steamed some broccoli to have on the side because I have this rather childish notion that anything green ‘will do me good’ if I’m unwell. Yes, I know it’s an old wives’ tale but, there again, I am an old wife so what can you expect?

100g green lentils
Marigold stock
6 Cauldron Cumberland sausages
1 large onion, sliced
1 tbsp olive oil
2 cloves garlic, crushed
1 tin chopped tomatoes
1 tsp dried oregano
50mls white wine
50mls water
½ tsp chilli flakes

Simmer the lentils for 15 minutes in just enough stock to cover, then drain and set aside.

In a large lidded frying pan fry the sausages and onions together in the olive oil until golden; add the garlic and fry for another minute or two then add the tomatoes, white wine and water, oregano and chilli flakes. Stir well and add the lentils; pop the lid on and simmer for 15 minutes.

Serves 2 generously

Sunday, 12 August 2012

Chilli Plum Chutney

Before I take up my favourite seat in front of the TV to watch the Olympic closing ceremony I thought I'd get this post on; I wrote it up a couple of days ago but I've been so taken up with sporting action I haven't had a minute to myself... (Incidentally, hasn't it been fabulous? I've loved every minute and have cried buckets whenever we've won gold, daft old bat that I am! Special mention to Andy Murray - I have at long last seen a Brit win a final at Wimbledon...!)

I’d been thinking recently about making some chilli tomato jam, but when I was in the market last week there were some lovely looking plums on the veg stall which set my mind wandering; would plum chutney with a chilli twist work? Well, I’d never know if I didn’t give it a go…so here it is.

It’s a gorgeous deep red from the plums and the red wine vinegar, but I must tell you the plums I bought, although a lovely colour, were absolutely the worst ones I have ever tried to stone; the stones seemed to have been embedded in the plums with the aid of superglue! As my fingers turned red, the air turned blue – I’m not ashamed to confess I said more than a few unladylike words…

However, recalcitrant plums aside, this was very easy and well worth doing if you happen to have a plum tree that has enjoyed our summer; well, when I say summer, what I actually mean is the few warm days that have constituted the British summer this year! The chilli I added gave just the right amount of oomph for us but if you like things a bit more spicy you can ramp it up as much as you like.

750g plums, stoned and chopped roughly
1 large Bramley apple, peeled and chopped
1 large onion, chopped
450g light muscovado sugar
350ml red wine vinegar
2 pieces of stem ginger in syrup, chopped
4 cloves garlic
1 tsp ground cumin
1 tsp salt
½ tsp chilli flakes

Put the stem ginger, garlic, cumin and salt into a blender with a couple of tablespoons of the measured vinegar and blitz until slushy.

Put the plums, apple, onions and sugar into a large wide pan, add the garlic and ginger mix followed by the vinegar and chilli flakes; give everything a good stir and bring to the boil. Lower the heat and simmer steadily for about an hour or so, giving it a stir from time to time, until thickened and almost no liquid remains when a channel is drawn across the bottom of the pan with a wooden spoon.

Pot up into hot sterilised jars whilst the chutney is still hot and allow to mature for at least 4-6 weeks before eating.

Makes 5 190g jars.

Saturday, 4 August 2012

Roast Vegetable Quesadillas

It’s not been a great couple of weeks for cooking for two reasons: firstly, we’ve had a guy in doing some decorating in the sitting room and the kitchen (the entire contents of the pantry were spread across the worktops at one point; it was as much as I could do to make a sandwich for lunch!) and, secondly, I’ve been busy watching the Olympics…..well, there won’t be another Olympics in the UK in my lifetime so I thought I’d better make the most of it!

The kitchen is now back up and running again so yesterday I made some rather tasty Chilli Plum Chutney (recipe to follow) and today for lunch we had these quesadillas; nice and easy finger food to eat whilst we watched Jess Ennis and others giving their all in the quest for a gold medal.

I’ve made quesadillas before using up leftover chilli sans carne but, in the absence of any chilli, I roasted some peppers and a couple of courgettes and red onions from the garden. I find roast veg are absolutely addictive; it’s surprising any of them made it into our lunch because I was picking at them immediately they came out of the oven…! This will make more veg than you need for the quesadillas but the leftovers are brilliant with some herby couscous.

3 mixed peppers
1 large red onion
2 small courgettes
2 tbsp olive oil
¼ tsp cayenne
100g grated mature cheddar
4 soft flour tortillas
4 tbsp soured cream
2 tbsp chopped chives
few grinds black pepper
sprinkle of cayenne

Turn the oven on at 200C

Deseed the peppers and chop them into chunky pieces, cut the courgettes into thick slices on the diagonal, peel the onion and cut it into eighths through the root. Toss the veg together with the olive oil and the cayenne then put them in a shallow baking tray and roast for 20-25 minutes.

Mix the sour cream with the chives and plenty of black pepper, put into a small ramekin and sprinkle with cayenne.

Use the grated cheese, some of the roast veg and the tortillas to make two 'sandwiches'. Place each tortilla sandwich in a dry non-stick frying pan and cook over a medium heat for two or three minutes until the cheese starts to melt then flip over to cook the other side.

Cut into quarters and serve with the sour cream dip.

**You’ve probably already noticed that I’m a massive tennis fan; Andy Murray is in the singles final tomorrow against some Swiss bloke called Federer (!) Well, whilst I've been typing this Andy and Laura Robson have just booked a place in the mixed doubles - also tomorrow!! I’m so excited I can barely think straight…!**

Thursday, 5 July 2012

Aubergine and Mushroom Lasagne

You will see from the second picture on this post why I don’t often make lasagne…apart from making it in individual dishes, (which I don’t have) how the hell do you serve it so that it looks as good on the plate as it does in the dish? Why does it never sit nicely on the plate so that you can see the separate layers? Answers on a postcard, please, because I’m damned if I know!

Despite its slightly iffy appearance this lasagne had a really nice depth of flavour; we both enjoyed it a lot. I love aubergine in any way shape or form; put it together with mushrooms, pasta and a cheesy sauce and I’m a very happy bunny indeed.

Incidentally, there was some of the aubergine sauce left over so I might have a go at making a quesadilla-type thingy for lunch tomorrow; handy to eat whilst watching Andy Murray in the semis at Wimbledon. I’ll be yelling at the television and my nerves will be shredded; definitely not the type of thing to watch on an empty stomach….Come on, Andy!!


1 medium aubergine, chopped into large dice
250g chestnut mushrooms, halved or quartered
1 large red onion, chopped
2 tbsp olive oil
2 cloves garlic, crushed
1 tin chopped tomatoes
1 tbsp tomato paste
75ml red wine
1 tsp dried basil
1 tsp dried oregano

4 or 5 sheets of fresh lasagne

250ml milk
20g butter
25g plain flour
1 tsp Marigold Bouillon stock powder
75g mature cheddar, grated
2 tbsp grated parmesan-style cheese

Heat the olive oil in a large pan; add the aubergine, mushrooms and onion and sauté over a medium heat for 10 minutes, add the rest of the sauce ingredients, bring to the boil then simmer gently for 30 minutes.

When cooked, put a layer of sauce in the base of an ovenproof dish then cover with a sheet of lasagne; repeat three or four times ending with a sheet of lasagne.

Heat oven to 180C

Put the milk, butter, flour and Marigold stock powder into a small saucepan over a medium heat and bring to the boil, stirring constantly until the sauce thickens; simmer for 5 minutes. Take off the heat and stir in the cheddar; pour the cheese sauce over the top layer of lasagne then sprinkle with grated ‘parmesan’.

Bake at 180C for 45 minutes until golden and bubbling

Serves 2

Friday, 8 June 2012

Stuffed Baguettes

This is one of those ‘it shouldn’t work…. but it does’ recipes. I saw it on the now defunct BBC Messageboard ages ago - thank you AlisonWright. It sounded interesting but I was a bit doubtful to be honest; I finally got round to giving it a go when we had my sister and brother-in-law round for a ‘kitchen-table’ type lunch a couple of weeks ago. Well, I'm happy to say, the baguettes went down a storm. The original recipe was far too meaty for my liking so a few adaptations were necessary but I kept to the basic recipe as much as possible.


They’re quite filling so you really only need a side salad to go with them or possibly some decent chutney and a few olives.

This recipe is definitely a keeper and will be making further appearances throughout the summer. Incidentally, I use the word ‘summer’ very loosely; it’s blowing a gale and throwing it down with rain here at the moment! (Don't tell anyone, but I've got the central heating on...!)

4 part-baked baguettes
1 large onion, chopped
1 tbsp olive oil
10 sun-dried tomatoes in oil, chopped
½ tsp dried oregano
200g mature cheddar cheese, grated
2 tbsp chopped chives
1 tbsp chopped parsley
4 eggs
2 tsp Dijon mustard

Fry the onion in the olive oil until softened and golden; set aside to cool. Slice the tops off the baguettes lengthways and discard then tear the bread from the centres to leave you with four canoe shapes; leave the walls of the baguettes about 1cm thick – if you make them too thin they’ll collapse when you cook them….trust me, I know! Crumble this bread into a large bowl; mix in the sun-dried tomatoes, oregano, cheese, chopped herbs and cooled fried onion. Beat the eggs with the mustard and stir into the breadcrumb mix.

Spoon this mixture into the four bread shells and place on a baking sheet, making sure they’re level.

Bake for 15-20 mins at 180C until golden.

Cut into three wedges on the diagonal before serving with salad.

Saturday, 26 May 2012

Mixed Bean Salad with Tomato Dressing

Well, I’m amazed to be able to say that the weather forecasters were right for once in their lives; the weather has been glorious for the last couple of days so, following on from what I said a couple of weeks back, I had a go at recreating another one of my ‘This is Not from Waitrose’ salads yesterday. I decided to go for the mixed bean variety.

The bean part was easy but the dressing required some thought. I wanted a dressing that was tangy without being citrusy and something that would be thick enough to cling to the beans; I definitely didn’t want to end up with something resembling soup with the beans swimming in a sea of dressing! I decided to go for a tomato and balsamic combo; it took a while to get just the taste I was after but I got there eventually.

Now, I have to tell you that we had this for dinner last night with quiche and new potatoes…and we had to stop ourselves from eating it all – we loved it! There was about two spoonfuls left (!) which we ate alongside our lunchtime salad sandwich today; I’m happy to report that it was just as good after 24 hours in the fridge.


1 tin mixed beans, well-rinsed and drained
100g fine green beans
50g frozen soya beans
½ a Romano red pepper, diced
¼ of a medium red onion, finely chopped
small handful of roughly chopped curly parsley

2 sun-dried tomatoes in olive oil
1 tbsp balsamic vinegar
1 tbsp red wine vinegar
1 small clove garlic, chopped
½ teaspoon Dijon mustard
1 heaped tsp sun-dried tomato paste
4 tbsp olive oil
½ tsp dried oregano
½ tsp sugar
1 tbsp water
black pepper

Top and tail the green beans and cut into thirds; bring ½ inch of water to the boil in a small saucepan, add the green beans and the soya beans, bring back to the boil and simmer for 3 minutes. Drain and plunge into cold water then drain well again.

Put the mixed beans and the cooled green and soya beans into a bowl, add the diced red pepper, the finely chopped onion and the parsley and mix well.

Put all the dressing ingredients into a blender and blitz until almost smooth.
Stir the dressing into the salad, cover with cling film and refrigerate for a couple of hours to let the flavours amalgamate.

Serves 4 or maybe even 6 as part of a barbecue or buffet (or 2 extremely greedy simple veggies!)

Monday, 21 May 2012

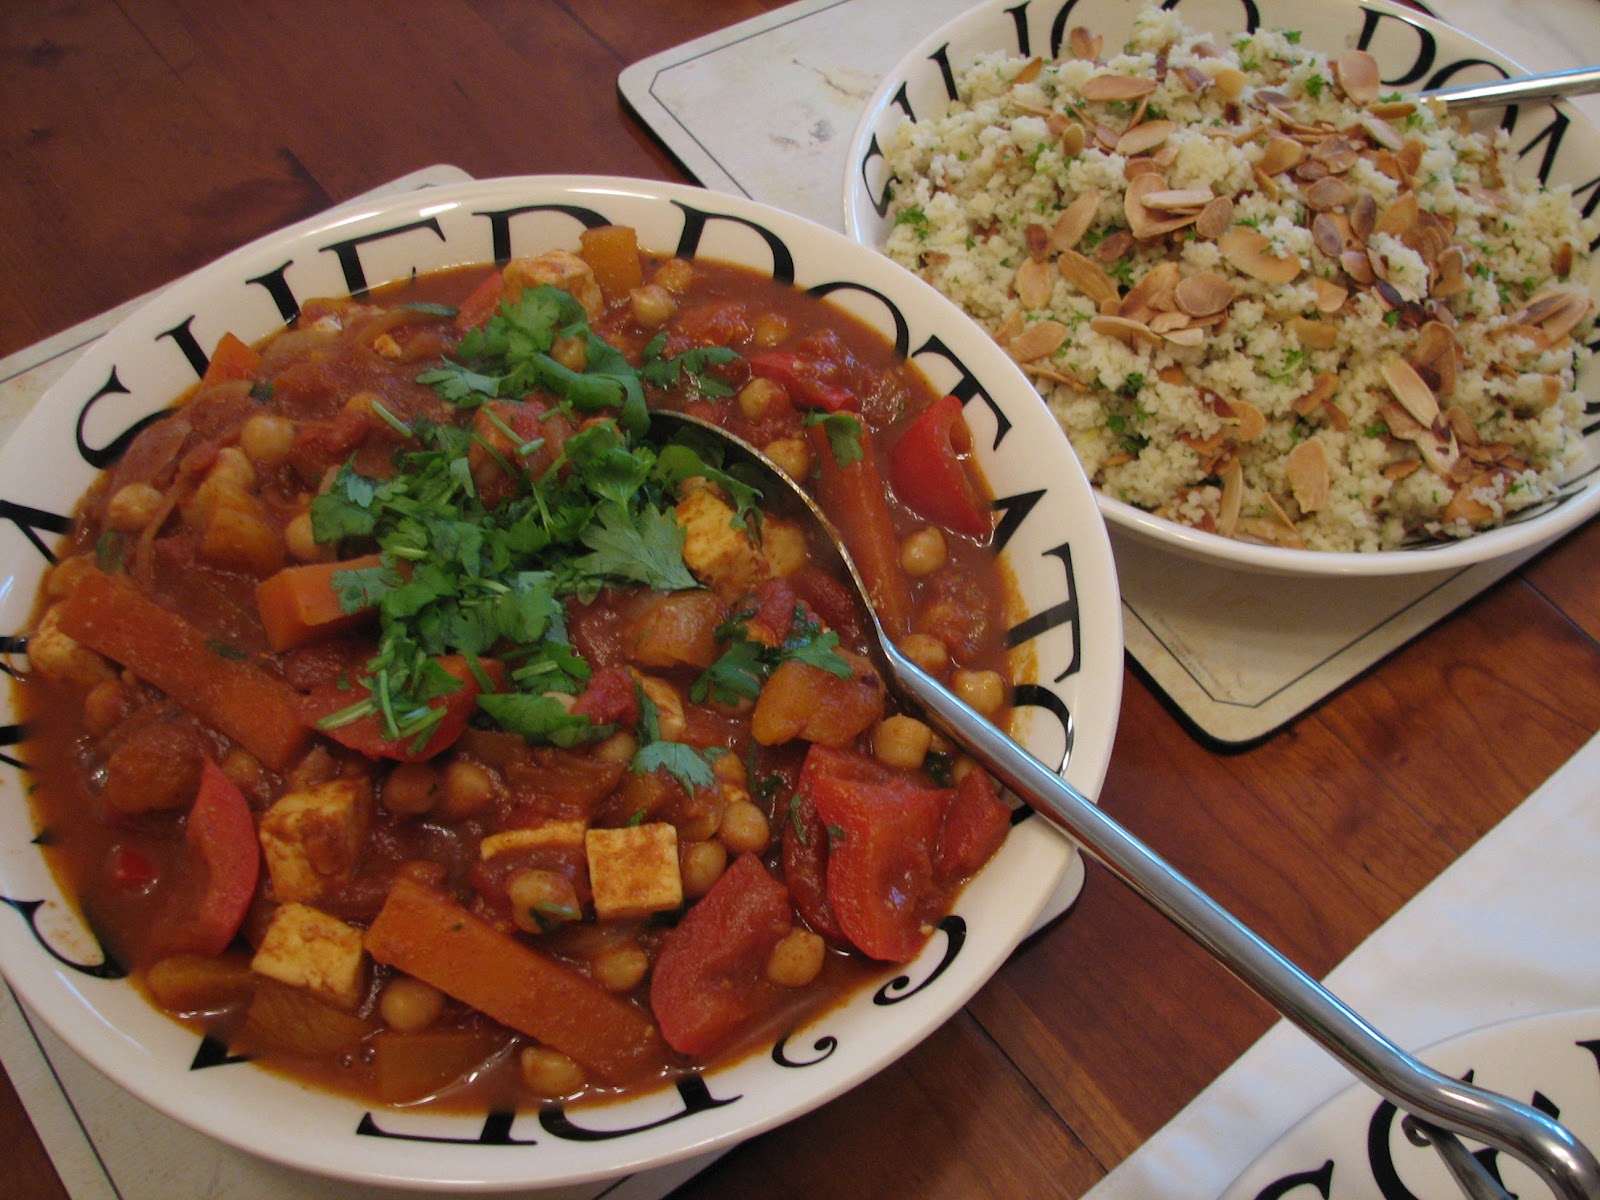
Fruity Tagine with Lemon and Almond Couscous

The weather here has been awful for the last few days, constantly grey and cold, nothing like May should be at all. In a spirit of optimism we planted a whole lot of vegetable seeds last week but it’s been so chilly I’m not entirely convinced they’ll survive. However, there are reports of things warming up a bit later in the week; hmm…I’ll believe it when I see it!

So…what to eat? It’s too cold for light summery meals but I feel heavier winter meals should be over by now. I just didn’t know what to do for dinner last night; it was a case of opening the fridge to see what inspired me.

I finished up making this tagine; I’ve followed tagine recipes in the past that I’ve not been too impressed with, they just didn’t seem to do it for me, so this time I made it up as I went along, adding more of this and less of that to suit our taste. I make no claims as to its authenticity (I know you don’t usually find paneer in a tagine!) but we enjoyed it and I’ll definitely make it again.


2 tbsp olive oil
1 large red onion, peeled and sliced
2 cloves garlic, crushed
2 tsp each of cumin, paprika and cinnamon
½ tsp chilli flakes
1 large carrot, peeled and cut into batons
1 red pepper, cut into chunks
1 tin chopped tomatoes
400ml stock
1 tbsp honey
250g paneer, cubed
1 tin chickpeas, drained
100g dried apricots, halved
handful of chopped coriander

200g couscous
275ml boiling stock
zest and juice of 1 lemon
50g toasted flaked almonds
handful of chopped parsley

Heat the oil in a large pan and fry the onion over a medium heat for five minutes; add the garlic and the spices and cook for a further minute or two.

Add everything else, except the chopped coriander, stir well and bring to the boil; pop a lid on and turn the heat down. Leave to simmer gently for 45 minutes.

About 10 minutes before the tagine is ready put the couscous, zest and juice of the lemon in a large bowl; add the boiling stock, stir once, cover the bowl with a plate and leave for 8-10 minutes. When all the stock has been absorbed, fluff up the couscous with a fork and stir in the toasted almonds and the chopped parsley.

Stir ¾ of the coriander into the tagine before serving and sprinkle the rest of it on top.

Serves 4

Thursday, 2 February 2012

Spicy Red Lentil & Coconut Soup

I’m sorry if the blog looks a bit soupy these days, it’s just that it’s been so cold recently that I don’t seem to want to eat much else. If I knew who to complain to about this perishing weather I’d be firing off an email and giving them a piece of my mind!

I’ll be so glad when the first new leaves of Spring start showing, I’ve had enough of winter now; I want longer days, I want warmth and I want to be outside planting vegetable seeds so that I can watch them grow. Oh, and I want to sit in the garden with bruschetta and olives for lunch.

But while I wait for all that….I’m eating soup.


1 tbsp olive oil
1 onion, finely chopped
1 carrot, finely chopped
2 fat cloves of garlic, crushed
1 level tsp ground cumin
1 level tsp ground coriander
1 level tsp garam masala
2 bay leaves
good pinch of dried chilli flakes
1.5l vegetable stock
200g red lentils
200ml coconut milk
1 tbsp chopped coriander

Heat the oil in a large saucepan and sauté the onion and carrot over a medium heat for 5 minutes; add the garlic, spices and bay leaves and sauté for a minute or two until the spices become aromatic. Stir in the stock and add the red lentils. Bring to the boil, stir well, then turn the heat right down and simmer gently for 20 minutes with the lid on.

Take off the heat and add the coconut milk. Remove the bay leaves then put half the soup in another saucepan or a large bowl and blitz with a stick blender; add the blitzed soup to the chunky soup, reheat for a couple of minutes and stir in the chopped coriander.

Enjoy with plenty of fresh bread.

Serves 4-6

Wednesday, 25 January 2012

Slow-Cooker Caramelised Onions

I saw a comment on a forum last week where a poster said she’d caramelised onions in a slow-cooker. To be honest I was very sceptical; surely you need the direct heat of a hob to get a good result? Won’t they just steam and go soggy? How does all the liquid evaporate? There was only one thing to do – have a go!

I had a look on the web, but although there were plenty of people who said they’d done it, no-one seemed to give definitive instructions. They generally seemed to go along the lines of “Add some butter to your onions and cook until done” Yup…really helpful, thanks for that!

So, as usual, I made it up as I went along and, having done it, I can definitely say…it works!

The hardest part was peeling and slicing all the onions, my eyes were streaming like mad, but it's a great way to get a decent quantity of onions caramelised, which you can then portion up and keep in the freezer until you need them. I use them regularly in nut roast, on pizza, in toasted cheese sandwiches, quiches, French onion soup and a zillion other ways so having them ready-to-use is a real time-saver.


2½ kg onions (you may not need them all)
50g butter
1 tbsp dark muscovado sugar
a few grinds of black pepper

Peel and slice enough onions to fill your slow-cooker right to the top. Sprinkle the sugar over the onions then cover with the butter cut into thin slices and a few grinds of black pepper.

Cook for two hours on ‘high’, stir the onions well, then cook for nine hours on ‘low’ (I left it overnight – the smell when we woke was lovely!) In the morning there was much less liquid than I expected, only about ½ cm, so I gave it all a stir and propped open the lid a little to let the steam escape then turned it up to ‘high’ for another two hours. That’s it!

It made six 200g pots which are now tucked away in the freezer, ready for use. I think I can feel a cheese and onion quiche coming on at the weekend….   

Monday, 5 December 2011

Christmas Red Cabbage

Red cabbage served hot as a vegetable is something that has only found its way onto my food radar in recent years. Seems like I was well behind the curve on this one because it’s evidently quite a popular Christmas side dish, which somehow I’d managed to miss! Anyway, the fact is, whenever I’ve had it in a restaurant I’ve loved it, so I thought it was time I had a go at making it myself.


Obviously, Delia was the first port of call for a recipe and, as ever, I found just the thing I was looking for. Mind you, I was a bit sceptical when I found the cooking time was at least two hours; I wouldn’t even want to imagine what a green cabbage would look like if it was cooked for two hours (don’t go there…!) but the red variety is a lot more robust and is happy to cook long and slow.


Before it was cooked it looked a bit like a winter coleslaw but, once cooked, it transformed into a fragrant, beautifully coloured blend of textures and flavours. We both had a large spoonful with that night’s dinner of sausages and mash with onion gravy…and it went down very well indeed! The rest has been portioned up and put safely in the freezer until the big day.

I changed one thing about Delia’s recipe: I cooked mine on the hob on a very low heat rather than in the oven. It was absolutely fine and the cooking time was the same.

On a different cabbagey note:
Every year, for as long as I can remember, I’ve bought a jar of pickled red cabbage just before Christmas; I always have some on Christmas night when I put out some nibbley bits for us to pick at. Just one jar and I never eat it at any other time of the year. It’s one of those family traditions, the reason for which is lost in the mists of time, a bit like nuts in their shells which always get thrown away the week after New Year (!) or sprouts even though nobody likes them; it just wouldn’t be Christmas without them. What a strange lot we are!

Saturday, 19 November 2011

Nut Roast Wellington

I’m planning to do this rather spiffing Nut Roast Wellington as the centrepiece of our Christmas lunch this year. Having never made one before the last thing I wanted was to put the whole thing together on Christmas morning only to find it didn’t work…! Nightmare! So, a couple of weeks ago, before I went down with the dreaded lurgy, I decided to have a trial run.

The thing I was most worried about was the pastry splitting, allowing all the filling to fall out, but I needn’t have worried; it all held together nicely and went surprisingly well.

Although the instructions look lengthy, it’s actually not as fiddly to do as I expected; it sounds much worse than it is. Now I’ve done it I feel quite confident about doing it again; in fact, I’m looking forward to it.

I shall be serving this on Christmas Day with roast potatoes, maple roast roots (parsnips, carrots and celeriac), sprouts with chestnuts and proper homemade gravy. Lovely!

Incidentally, if you're looking for something to serve with the leftover Wellington, can I suggest this Root Vegetable Gratin? It tastes brilliant and it cleverly uses up any leftover roasted roots from Christmas Day.


Nut Roast mixture:

1 onion, finely chopped
1 tbsp olive oil
200g whole mixed nuts
175g fresh wholemeal breadcrumbs
75g mature cheddar, grated
200ml stock
1 egg, beaten
½ tsp Marmite
1 tsp dried oregano
25g dried cranberries

Mushroom Duxelles:

250g chestnut mushrooms, very finely chopped
1 shallot, finely chopped
few fresh thyme leaves
25g butter

500g pack of ready-rolled puff pastry
1 egg, beaten


For the Mushroom Duxelles:
Sweat the mushrooms, thyme and chopped shallot in the butter over a very low heat until all the liquid has evaporated and you are left with an almost dry mushroom pate. Set aside to cool.

For the Nut Roast:
Sauté the chopped onion in the olive oil until golden and set aside to cool.
Grind the nuts in a food processor until reasonably fine, but still with some texture. Place the ground nuts in a large bowl; add the breadcrumbs, grated cheddar, oregano and cooled onion; mix well. (At this point you can put it in the fridge and finish it off next day, if you want.) Whisk the stock together with the beaten egg and Marmite; add this to the bowl and mix with a fork until the mixture starts to hold together. Remove about 1/3 of the mixture to a small bowl and stir in the dried cranberries.

Assembling the Wellington:
Unroll the pastry onto a lightly floured surface and roll lightly with a rolling pin to make it a bit larger.

Put the nut roast mixture with cranberries in the centre of the pastry and form into a rough rectangle about 8cm x 12cm. Spread the mushrooms duxelles over the top, then cover with the remaining nut roast mixture.

Now the fun begins! Fold the edges of the pastry over like a parcel, to completely enclose the nut roast, using the beaten egg to seal all the edges. You may need to cut off a bit of the pastry to avoid the seams being too thick. (I cut some little Christmas trees from the trimmings and stuck them on top but, quite frankly, that was a waste of time!)

Line a shallow baking tray with non-stick baking paper and, very carefully, turn the Wellington over and lay it, seam-side down, on the baking tray. Brush all over with the rest of the beaten egg and bake at 210C for 20 minutes then turn the temperature down to 180C and cook for a further 35-40 minutes until deep golden brown and cooked through. (I have a fan oven so you may need to adjust timings or temperatures a bit).


It looked a bit like a rather gorgeous loaf of bread when it came out of the oven! Allow to cool for about 20 minutes before cutting in thick slices to serve.

Serves 4 with lots of lovely leftovers to pick at later! It's also fabulous cold with chutney and salads on Boxing Day.


Quick update:  Last year I decided to go down the route of making a plait. To be honest, it was much easier and quicker than the original version and it was just as yummy.

All I did was lay the ready-rolled puff pastry on a floured baking sheet, put the same filling as above length-ways down the centre third, then cut the pastry either side into an even number of strips slightly on the diagonal; brush the strips with beaten egg then fold over the filling, making sure you tuck the ends in neatly. Brush the whole thing with more beaten egg and bake as above. 


And there you go - you have yourself a gorgeous golden Christmas Nut Roast Plait!

Saturday, 12 November 2011

Leek and Potato Soup

Cooking has sort of fallen by the wayside for almost a couple of weeks; I started off with a cold then managed to pick up a stomach bug (deep joy!) and I've now got another cold; when I cough I sound like a sealion…so attractive!

I’ve just about cleaned out all the soups I had stored in the freezer – I seem to have lived on soup and toast recently – so I’ve had a soup-making session in the kitchen this morning. Leek and potato is very comforting and easy on a delicate tum whilst tomato and red lentil should pep up my poor old jaded tastebuds.

Two weeks ago I was planning to make my Christmas cake and do a bit a baking for the freezer; hopefully next week I shall return to the land of the living and get cracking.

Early night for me I think.


25g butter
4 medium leeks
1 medium onion, peeled and chopped
1 large floury potato, peeled and diced
1l stock
1tbsp crème fraiche
a little chopped parsley

Melt the butter gently in a large saucepan; trim off the greenest part of the leeks (keep it for making stock) then finely chop the rest of the leeks and add them to the pan along with the chopped onion and diced potato. Turn the vegetables to coat them with the melted butter, put the lid on and let them sweat over a very low heat for 15 minutes. Add the stock and bring to the boil; simmer gently for a further 15 minutes.

Blitz the soup like billy-o with a stick blender until it’s silky smooth then stir in the crème fraiche.

Sprinkle with chopped parsley and serve piping hot.

Thursday, 3 November 2011

Tomato and Basil Pasta Sauce

This is one of the most useful recipes ever – a multi-purpose tomato and basil pasta sauce which can be made in bulk and frozen in handy-size portions to bring out whenever you need it. It's so simple that I dithered for ages about putting it on here; well, let's be honest, pasta sauce isn't terribly exciting, is it?

I first started making this years ago when I was still at work and always looking for shortcuts. These days I have a lot more time on my hands, but I still make a batch for the freezer every couple of months; it’s brilliant for roast veg pasta bakes, garlicky mushrooms with spaghetti, spag bol with soya mince, gnocchi and aubergine bake, pizzas…the list is almost endless.

Just because it’s made in bulk it doesn’t mean that every pasta meal you use it for will taste the same. To each defrosted portion, along with your chosen veg, add some different herbs or maybe a splash of balsamic, perhaps a few olives and capers, some chilli flakes…or whatever takes your fancy at the time.


2 onions, finely chopped
5 garlic cloves, crushed
1 tbsp of oil from a jar of sun-dried tomatoes
8 sun-dried tomatoes, chopped
50ml red wine
3 tins chopped tomatoes
1 tbsp tomato paste
250ml stock
1 tsp dried thyme
1 tsp dried oregano
1 tsp sugar
2 tbsp chopped fresh basil


Heat the oil in a large pan and gently fry the onion for 5 minutes; add the crushed garlic and fry for a further minute. Add all the other ingredients, except the basil, stir well and bring to the boil; turn the heat right down and simmer without a lid for about an hour, by which time the sauce will be thickened and concentrated. (I feel I should warn you, the contents of the pan will plop and bubble like ‘Old Faithful’ in Yellowstone Park; it’ll make an awful mess of your cooker and splashback!)

Take off the heat and add the chopped basil; if you like a smooth sauce you can blitz it but I prefer to leave it chunky. Allow to cool then divide into your chosen portions and freeze.

Depending on what I use it for I find this makes enough for four to six meals for the two of us.

Monday, 10 October 2011

Mushroom Stroganoff with Rosti

I make mushroom stroganoff quite a bit; it’s quick and easy for those times when you want something really tasty but you don’t want to faff about too much. No fancy ingredients, just storecupboard stuff; I use crème fraiche because I like the slightly sharp tanginess of it and it’s less likely to split, but most recipes use cream so, if you have half a pot of cream hanging around in the fridge that you want to use up, feel free to sub that instead.

I usually serve stroganoff with rice but the husband requested we have it with rosti because he’d seen a recipe in a magazine. Now, I have a difficult relationship with rosti, they never quite do what I expect them to; although, to be fair, I’m not sure exactly what I do expect. (Incidentally, does the plural of rosti need an 's'?)

These ones were better than any I’ve made previously, but I still think there’s room for improvement. Next time I think I’ll add a small grated onion and just make one large rosti each. I can then serve the stroganoff on top; a bit like mushrooms on toast….without the toast!

25g butter
1 small onion, finely chopped
250g chestnut mushrooms, thickly sliced
2 cloves garlic, crushed
1 tsp paprika
1 tsp fresh thyme leaves
4 tbsp crème fraiche
25ml white wine
chopped parsley to sprinkle

2 large floury potatoes
ground black pepper
2 tbsp olive oil

Parboil the potatoes in their skins for about 15 minutes; drain and allow to cool. This can be done in advance or even the day before if you like.
Grate the potatoes coarsely into a large bowl, add plenty of black pepper and mix well; set aside until you’re ready to cook the rosti.

Melt the butter in a large pan and sauté the onion and garlic for 5 minutes; add the thickly sliced mushrooms and cook until almost all the liquid from the mushrooms has evaporated; add the paprika, thyme and white wine. Stir well and cook for a minute or two then add the crème fraiche. Take off the heat and keep warm while you cook the rosti.

Heat the olive oil in a large frying pan (I used two small pans). Place four large spoonfuls of the grated potato in the pan and flatten slightly with a spatula. Cook for 4-5 minutes on each side until golden.

Divide the rosti and stroganoff between two warmed plates and sprinkle with plenty of chopped parsley.

Serves 2

Wednesday, 28 September 2011

Spiced Apricot and Apple Chutney

I thought this chutney would be the last one to go on the blog this year, but I have a sneaking suspicion that a small batch of green tomato chutney is also on the cards. We’ve had masses of gorgeous toms from the garden but there are a few which are stubbornly resisting turning red. I've been outside and threatened them….if they won’t behave themselves it’ll be the chutney pot for ‘em!

This particular one was made to use up a lot of bits and pieces that were looking for a home. I had the last couple of cooking apples from the bagful my sister gave me, a Tupperware box of frozen apricots, some very small red onions from the garden that weren’t much use for anything else and half a bag of dried dates which were leftover from something but I can’t remember what!

Twenty minutes of chopping and an hour or so of simmering gave me four jars of a rich, spicy chutney that I suspect will go well with cheese and crackers. My window cleaner said the house smelled lovely...now, be fair, you can't get a better recommendation than that!

I used odds and sods that I had to hand for this but, if you want to substitute plums for apricots or maybe use sultanas instead of dates, just remember to keep the proportions roughly the same and you’ll be fine. Chutney is very forgiving.

225g red onions, chopped
300g bramley apples, peeled and chopped
350g apricots, stoned and chopped
60g dried dates, chopped
2 cloves garlic
1 tsp salt
1½ tsp mixed spice
1 tsp dry mustard
300g soft brown sugar
300ml red wine vinegar

Put the garlic, salt, spice and mustard into a blender with a couple of tablespoons of the measured vinegar and blitz until slushy.

Put the fruits, onions and sugar into a large wide pan, add the garlic and spice mix followed by the vinegar; give everything a good stir and bring to the boil. Lower the heat and simmer steadily for about an hour until thick and no liquid remains when a channel is drawn across the bottom of the pan with a wooden spoon.

Pot up into sterilised jars whilst the chutney is still hot and allow to mature for 4-6 weeks before eating.

Makes 4 190g jars.

Wednesday, 21 September 2011

Butternut Bake

This is my take on a Simon Rimmer recipe I saw online recently for a roast squash bake; it looked OK but I thought it had far too much cheese, not enough onion and nowhere near enough garlic for our taste; oh, and I also thought the recipe was poorly written, but apart from all that it was fine!

This dish is one of those where the whole is definitely greater than the sum of its parts. It doesn’t look much when it’s assembled and you’re just about to put it in the oven, but once it’s cooked all the flavours and textures come together; it smells wonderful while it’s cooking and it tastes even better.


1 small butternut squash
1 tbsp olive oil
2 red onions, peeled and cut into eighths through the root
5 cloves garlic
6 tsp Sacla Organic pesto
8 sun-dried tomato halves in oil from a jar
125g soft goats’ cheese
1egg
2tbsp crème fraiche
2tbsp grated parmesan-style cheese

Peel and chop the squash into chunks, discarding the seeds; put the chunks into a large baking tray, pour the oil over and mix the whole lot together with your hands. Heat the oven to 200C and put the tray in for 20 mins. Take the tray out of the oven, add the red onion wedges and the unpeeled garlic cloves, then put it back in the oven for another 20 minutes until the squash is tender and the onions are cooked and lightly caramelised.

Put the cooked squash into an ovenproof dish followed by the onion and the garlic, which you need to squeeze out of its papery case. Put teaspoonfuls of the pesto over the squash and onions then lay the tomato halves over the top.

Whisk together the goats’ cheese, egg and crème fraiche and spoon it over the vegetables. Scatter the ‘parmesan’ over the top and pop it in the oven at 200C for 20 mins until golden and bubbling.

I served it with a simple tomato and onion salad (we’re knee-deep in toms at the moment; they’re ripening faster than we can eat them!)

Serves 2

Friday, 16 September 2011

Curried Fruit Chutney

This is another one of the chutneys and preserves that I’ve made over the past couple of weeks. It’s been a bit like running a production line at times, but it’s the same every year at around this time; September is always a hive of activity whilst the autumnal fruits are widely available and cheap.

There’s something very elemental, almost primal, about having a store of food for the winter months. Yes, I know I don’t have to do this these days; times have changed, we don’t starve any more if we don’t put food away for the winter and I could just go and buy jars of whatever I want from Waitrose, but I can’t buy the sense of satisfaction that goes with it. I love opening the pantry door to find it groaning under the weight of jars.

We’re already enjoying both jams I made in the summer. Mincemeat, plum compote, red onion marmalade and spiced apple butter are all ready to eat, but the spiced apple and apricot chutney, tomato and cranberry relish and this curried fruit chutney will all benefit from some maturing time. Clementine marmalade won’t be made until November when the fruit is reasonably priced in the run-up to Christmas. Phew, I think that’s about it for this year!

This chutney is ridiculously easy and, judging from the taste I had, it’ll make a very good addition to a hot curry on a cold night; I suspect it'll also go down well with a slice or two of cold nut roast or maybe cheese on toast.

250g onions, chopped
750g (prepared weight) fruit - I used apples, plums, rhubarb and apricots
25g garlic
25g fresh root ginger
1 tsp salt
½ tsp cayenne
1 tsp cumin
1 tsp coriander
2 tsp curry powder
300g white sugar
300ml cider vinegar

Put the garlic, ginger, cayenne, salt, cumin, coriander and curry powder into a blender with a couple of tablespoons of the measured vinegar and blitz until slushy.

Prepare the fruit, chop into large dice and place in a large wide pan with the onions. Add the garlic and ginger mixture, the sugar and the vinegar. Bring to the boil, stir well and simmer uncovered over a low heat for about 1½ hours until thick.

Pot into sterilised jars whilst still hot and leave to mature for 6 – 8 weeks before eating.

Makes 6 190g jars.