Well, here we have the finished article for this year.
In truth it doesn’t look much different from the one I usually do although the cake itself, under the topping, is entirely different as you will have seen from the post below. I seem to have hit on a winning formula for the topping of the cake a few years ago; it works for us and if it ain’t broke I won’t fix it.
There’s a very good chance that it’ll be cut into quite soon, since Mr S-V keeps giving it the eye every time he opens the pantry door! As he quite rightly points out, though, there’s no sense in keeping everything back to eat at Christmas because it’s just not humanly possible to have a taste of all the goodies in one day. You can’t deny his logic…
1 18cm square rich fruit cake
white marzipan
a little icing sugar
3 tbsp apricot jam
1 tbsp brandy
soft dried apricots
whole brazils
whole pecans or walnuts
ribbon
Make the glaze by heating the jam and brandy gently in a small pan until the jam melts, then rub the mixture through a sieve with the back of a spoon.
Using a pastry brush, paint the top of your cake generously with the glaze; roll out the marzipan to a depth of about 0.5cm on a surface lightly dusted with icing sugar and cut to size using the base of your cake tin as a guide. Lay the marzipan on top of the cake and brush with more glaze.
Arrange the fruit and nuts on the marzipan, pressing them in lightly, then brush generously with the rest of the glaze.
Tie the ribbon round the side of the cake.
Store in an airtight tin in a cool place.
Update: 22.12.14
Cake has been cut and sampled - a resounding success. Really fruity with a moist texture. Oh, my poor expanding waistline... Many thanks to Russell at Flatford for a brilliant recipe.
Search This Blog
Showing posts with label Cakes and Bakes. Show all posts
Tuesday, 16 December 2014
Tuesday, 4 November 2014
This Year's Christmas Cake
Well here we are in the first week of November and I’m already getting ready for Christmas. If I’m not careful I’ll be getting ahead of myself!
It looks pretty damn fine to me as it is, but I’ll top it with marzipan and a pattern of glazed nuts and fruit to prettify it a bit. Can’t wait to have a slice with a cuppa a bit nearer the big day!
I emailed Flatford to ask them if I could use Russell’s recipe on the blog and they very kindly agreed, so here it is in its entirety… The only thing I changed was the baking time, although that may be my oven; I ended up cooking it for exactly 3 hours.
Over the weekend the house smelt like Christmas had already arrived; I made our Christmas pudding on Saturday and on Sunday I made this years’ cake. I used a recipe by Russell Clement, Catering Manager at Flatford, one of the National Trust’s properties. The recipe was on the back of our latest newsletter and I was intrigued by it – I’ve never seen a recipe where some of the fruit was blitzed and then mixed in, but it sounded so good I just had to give it a try. Obviously I haven’t tasted the cake yet but if the taste of the mixture (when I ran my finger round the empty bowl!) is anything to go by it’s definitely a winner.
Fruit-packed Christmas Cake
100g dried pears, finely chopped
100g dried apple, finely chopped
150g raisins
300g sultanas
50g dried sour cherries
100g dried cranberries
50g best quality candied peel, finely chopped
40g candied stem ginger, finely chopped
¼ tsp ground cloves
2 bay leaves
2 clementines, zest and juice
150ml liqueur e.g. Cointreau, Kirsch, Cassis or Framboise
50g hazelnuts, blanched (or skins removed)
50g almonds, blanched
200g butter, unsalted
175g dark brown muscovado sugar
4 free-range eggs at room temp, beaten
250g SR flour
100g dried apple, finely chopped
150g raisins
300g sultanas
50g dried sour cherries
100g dried cranberries
50g best quality candied peel, finely chopped
40g candied stem ginger, finely chopped
¼ tsp ground cloves
2 bay leaves
2 clementines, zest and juice
150ml liqueur e.g. Cointreau, Kirsch, Cassis or Framboise
50g hazelnuts, blanched (or skins removed)
50g almonds, blanched
200g butter, unsalted
175g dark brown muscovado sugar
4 free-range eggs at room temp, beaten
250g SR flour
1.The night before you bake the cake, place all the prepared dry fruit, ginger, ground cloves, bay leaves, zest and juice of the clementines and the booze into a large non-reactive bowl and mix well. Take a big sniff (it's heady stuff and smells wonderful!) then cover and leave to steep overnight in a cool place.
2.Grease and line a 20cm cake tin. (I used an 18cm square tin) Leave the parchment protruding around the edge of the tin, standing about 5-6cm proud of the edge to protect the cake during the long cooking. Pre-heat the oven to 125C (fan) or 150C (conventional).
3.Toast the nuts until golden brown, place them in a processor and pulse until they are finely chopped. Add the nuts to the fruit mixture, remove the bay leaves, mix well and put 350g of the fruit and nut mixture back into the processor. Blend to a thick paste.
4.Beat the sugar and butter together until the sugar has dissolved then slowly combine the eggs, beating well after each addition. Fold in the flour, then stir in the paste and the rest of the fruit and nut mixture.
5.Spoon the mix into the tin and level the surface well. Bake in the pre-heated oven for 2-2½ hours. Check the cake by inserting a skewer or knife into the centre and see that it comes away clean.
6.Leave the cake in the tin to cool then remove, leaving the parchment in place, and wrap tightly in foil until the big day.
7.This cake is very versatile, it will take any kind of finish you like from a simple glaze to draping in fondant so let your imagination guide you!
Saturday, 20 September 2014
'School Dinner' Jam and Coconut Sponge
Mr Simply Veg and I were talking about school dinners the other day; I don’t know how we got on to the subject – I can only say when you get to our age you start to ramble a bit.
I loved school dinners mainly because they were so much nicer than the meals I had at home. Sadly I can honestly state, without any fear of contradiction, that my mother never managed to serve up an edible meal in her life; you know the sort of thing…if the veg are still recognisable they haven’t been boiled for long enough. Gravy…? One lump or two?
Anyway, Mr S-V said his school dinners weren’t particularly memorable but then he went all dewy eyed about a jam and coconut sponge he used to have for pudding. I was tasked with recreating this culinary masterpiece and by all accounts I did a pretty good job. *polishes halo*
Himself is a very happy chappie and I am now officially a domestic goddess. As I’ve said before…he’s easily pleased.
170g unsalted butter
170g caster sugar
3 eggs
170g self-raising flour
1 tsp vanilla extract
3 tbsp strawberry jam
50g desiccated coconut
Line a 16cm x 24cm baking tin with baking parchment. Turn the oven on to 180C.
Cream the butter and sugar together with a hand-held mixer until light and fluffy then beat in the eggs, one at a time. Fold in the flour and the vanilla extract. Scoop into the lined tin, level the top, and bake for 25 to 30 minutes.
When cooked, remove from the oven and leave to cool in the tin for 10 minutes then turn out onto a cooling rack.
When the cake is completely cool spread with the jam, going right up to the edges, then sprinkle over the desiccated coconut.
Cut into squares and serve with custard. Lots of custard. Also good served as cake with a decent cuppa.
I loved school dinners mainly because they were so much nicer than the meals I had at home. Sadly I can honestly state, without any fear of contradiction, that my mother never managed to serve up an edible meal in her life; you know the sort of thing…if the veg are still recognisable they haven’t been boiled for long enough. Gravy…? One lump or two?
Anyway, Mr S-V said his school dinners weren’t particularly memorable but then he went all dewy eyed about a jam and coconut sponge he used to have for pudding. I was tasked with recreating this culinary masterpiece and by all accounts I did a pretty good job. *polishes halo*
Himself is a very happy chappie and I am now officially a domestic goddess. As I’ve said before…he’s easily pleased.
170g unsalted butter
170g caster sugar
3 eggs
170g self-raising flour
1 tsp vanilla extract
3 tbsp strawberry jam
50g desiccated coconut
Line a 16cm x 24cm baking tin with baking parchment. Turn the oven on to 180C.
Cream the butter and sugar together with a hand-held mixer until light and fluffy then beat in the eggs, one at a time. Fold in the flour and the vanilla extract. Scoop into the lined tin, level the top, and bake for 25 to 30 minutes.
When cooked, remove from the oven and leave to cool in the tin for 10 minutes then turn out onto a cooling rack.
When the cake is completely cool spread with the jam, going right up to the edges, then sprinkle over the desiccated coconut.
Cut into squares and serve with custard. Lots of custard. Also good served as cake with a decent cuppa.
Thursday, 26 September 2013
Lemon, Poppy Seed and Yogurt Muffins
I ripped an advert for Alpro soya yogurt out of a magazine a couple of months ago, because part of the ad was a recipe for lemon, poppy seed and yogurt muffins. Alpro is wonderful stuff and I love it with a dollop of fruit compote – it’s rare that I don’t have a tub of it in the fridge – so I thought baking with it could be an interesting development.
The muffins in the advert looked lovely, probably because they’d had a team of food stylists fiddling with them for half an hour, but on closer inspection it looked a really strange recipe…there was an enormous amount of baking powder in it (2 tbsp!!), there didn’t seem to be enough lemon zest to give any flavour and it seemed like an awful lot of mixture for only eight muffins. I sometimes wonder if anyone actually tests these recipes before they’re let loose on an unsuspecting public!
Well, in the spirit of bravery (or possibly stupidity!) I decided to give the recipe a go. With a few tweaks and twirls it actually turned out OK. I used self-raising flour instead of plain, dropped the amount of baking powder drastically, upped the amount of lemon zest and discovered that it actually made twelve decent sized muffins, not eight.
I added a little drizzle of lemon icing to smarten them up a bit and, although they wouldn’t win a prize at the village fĂȘte, they were nice with a cuppa and a good book.
225g SR flour
2 tsp baking powder
140g caster sugar
grated zest of a lemon
2 tbsp poppy seeds
1 tbsp lemon juice
1 egg
245g Alpro Plain Yogurt
100g melted butter
2 tbsp icing sugar + lemon juice to mix
Mix the five dry ingredients together in a large bowl. Mix the four wet ingredients together in a large jug. Pour the wet into the dry and fold together just until no dry flour remains. Do not overmix; it doesn’t need to be completely smooth.
Divide the mixture between twelve muffin cases set into a muffin tin. Bake for about 20 minutes at 190C until golden and puffed.
Cool on a wire rack. When cold, drizzle with a little lemon icing.
Makes 12
The muffins in the advert looked lovely, probably because they’d had a team of food stylists fiddling with them for half an hour, but on closer inspection it looked a really strange recipe…there was an enormous amount of baking powder in it (2 tbsp!!), there didn’t seem to be enough lemon zest to give any flavour and it seemed like an awful lot of mixture for only eight muffins. I sometimes wonder if anyone actually tests these recipes before they’re let loose on an unsuspecting public!
Well, in the spirit of bravery (or possibly stupidity!) I decided to give the recipe a go. With a few tweaks and twirls it actually turned out OK. I used self-raising flour instead of plain, dropped the amount of baking powder drastically, upped the amount of lemon zest and discovered that it actually made twelve decent sized muffins, not eight.
I added a little drizzle of lemon icing to smarten them up a bit and, although they wouldn’t win a prize at the village fĂȘte, they were nice with a cuppa and a good book.
225g SR flour
2 tsp baking powder
140g caster sugar
grated zest of a lemon
2 tbsp poppy seeds
1 tbsp lemon juice
1 egg
245g Alpro Plain Yogurt
100g melted butter
2 tbsp icing sugar + lemon juice to mix
Mix the five dry ingredients together in a large bowl. Mix the four wet ingredients together in a large jug. Pour the wet into the dry and fold together just until no dry flour remains. Do not overmix; it doesn’t need to be completely smooth.
Divide the mixture between twelve muffin cases set into a muffin tin. Bake for about 20 minutes at 190C until golden and puffed.
Cool on a wire rack. When cold, drizzle with a little lemon icing.
Makes 12
Sunday, 24 March 2013
Hot Cross Buns
You can really tell it's Spring; the garden is under a blanket of snow and the temperature hasn't risen above -1C all day! Unbelievably, we change the clocks to Summertime next week...
There's only one thing to do – make Hot Cross Buns! Baking is not my forte, to be honest I’m not sure I even have a forte, but nothing ventured, nothing gained.
As it happens it was even more simple than usual since I threw the ingredients in the bread machine for the mixing and first proving, although it's not rocket science even if you choose to do it by hand. The warm spicy aroma while they were cooking was absolutely tantalising – so much so, we were forced into sampling one of the buns while they were still warm; purely in the interests of quality control, you understand….ahem.
I got halfway through measuring out the ingredients only to find the mixed dried fruit I was sure was in the pantry, wasn’t. Don't ask... Half a bag of cranberries and a handful of raisins had to suffice and made a very good substitute, happily.
½ a sachet of yeast
250g strong white flour
½ tsp salt
1 tsp sugar
25g butter
125ml milk
1 egg
½ tsp mixed spice
1 tsp cinnamon
75g mixed dried fruit
25g mixed peel
1 heaped tbsp plain flour
If you have a bread machine put the dough ingredients into the bread tin in the order given and set the machine going on the ‘Basic: dough: raisin’ setting, putting the fruit either in the dispenser or adding it when the machine beeps. When the machine stops follow the steps ** below.
If you’re making by hand, put the dry ingredients (except the fruit) and the egg into a large bowl, heat the butter and milk together until barely warm then add to the bowl. Mix with a wooden spoon to form a dough then turn onto a lightly floured surface and knead until the dough becomes smooth and silky; put the dough back in the bowl and cover loosely with clingfilm; leave in a warm place to prove until doubled in size then knead in the fruit and follow ** below.
**Divide the dough into eight equal pieces and, with lightly oiled hands, form into slightly flattened rounds. Put onto a baking tray lined with silicone paper, cover loosely with clingfilm and leave to prove in a warm place until doubled in size.
Turn the oven on to 200C.
Mix the plain flour with two tablespoons of water to make a thick paste. Spoon into a plastic sandwich bag, squeeze the paste into one corner and twist the bag tightly so it doesn't escape. Cut a tiny corner off the bag and you now have yourself a disposable piping bag.
Once the buns have doubled in size pipe crosses onto them and bake for 15-20 minutes until golden.
Boil 25g sugar with 2 tbsp water for 5 minutes to make a syrup then brush the buns with syrup whilst they’re still hot. Cool on a wire rack.
Serve with butter and jam.
There's only one thing to do – make Hot Cross Buns! Baking is not my forte, to be honest I’m not sure I even have a forte, but nothing ventured, nothing gained.
As it happens it was even more simple than usual since I threw the ingredients in the bread machine for the mixing and first proving, although it's not rocket science even if you choose to do it by hand. The warm spicy aroma while they were cooking was absolutely tantalising – so much so, we were forced into sampling one of the buns while they were still warm; purely in the interests of quality control, you understand….ahem.
I got halfway through measuring out the ingredients only to find the mixed dried fruit I was sure was in the pantry, wasn’t. Don't ask... Half a bag of cranberries and a handful of raisins had to suffice and made a very good substitute, happily.
250g strong white flour
½ tsp salt
1 tsp sugar
25g butter
125ml milk
1 egg
½ tsp mixed spice
1 tsp cinnamon
75g mixed dried fruit
25g mixed peel
1 heaped tbsp plain flour
If you have a bread machine put the dough ingredients into the bread tin in the order given and set the machine going on the ‘Basic: dough: raisin’ setting, putting the fruit either in the dispenser or adding it when the machine beeps. When the machine stops follow the steps ** below.
If you’re making by hand, put the dry ingredients (except the fruit) and the egg into a large bowl, heat the butter and milk together until barely warm then add to the bowl. Mix with a wooden spoon to form a dough then turn onto a lightly floured surface and knead until the dough becomes smooth and silky; put the dough back in the bowl and cover loosely with clingfilm; leave in a warm place to prove until doubled in size then knead in the fruit and follow ** below.
**Divide the dough into eight equal pieces and, with lightly oiled hands, form into slightly flattened rounds. Put onto a baking tray lined with silicone paper, cover loosely with clingfilm and leave to prove in a warm place until doubled in size.
Turn the oven on to 200C.
Once the buns have doubled in size pipe crosses onto them and bake for 15-20 minutes until golden.
Boil 25g sugar with 2 tbsp water for 5 minutes to make a syrup then brush the buns with syrup whilst they’re still hot. Cool on a wire rack.
Serve with butter and jam.
Sunday, 7 October 2012
Cinnamon Buns
I woke up yesterday with an unmistakeable dryness in my
throat and the awful aching all over that could only mean one thing…yep, my
first cold of the winter; and it’s only October. Rats!
Comfort food was called for and it had to be something that
didn’t involve too much effort on my part. On the cover of this month’s
Waitrose mag there’s an enticing picture of cinnamon buns, but the recipe includes
an icing that I didn’t like the sound of and it also makes 16 buns…just a tad
over the top for the two of us! So, feeling inspired, I unearthed a recipe for an
enriched bread dough (which I originally used for hot cross buns)
and cheated by doing the kneading and first proving in the bread machine but, if
you’re feeling less fragile than me, you could do it by hand. All I had to do
was pop the filling in, give them a second proving, whack ‘em in the oven and
Bob’s your uncle!
I’m not experienced at yeast cookery, and I’ve never made these before, but I was quite chuffed at how well they turned out – true, they don’t look quite like the ones on the magazine cover, but what you see is what you get; the food in my pictures is actually edible and it hasn’t been prettied up by a food 'stylist'!
½ tsp salt
1 tsp sugar
25g butter
110ml milk
1 egg
25g melted butter
50g soft brown sugar
2 tsp cinnamon
50g dried mixed fruit
a little sugar for sprinkling
I’m not experienced at yeast cookery, and I’ve never made these before, but I was quite chuffed at how well they turned out – true, they don’t look quite like the ones on the magazine cover, but what you see is what you get; the food in my pictures is actually edible and it hasn’t been prettied up by a food 'stylist'!
½ a sachet of fast-action yeast
250g strong white flour½ tsp salt
1 tsp sugar
25g butter
110ml milk
1 egg
Filling:
50g soft brown sugar
2 tsp cinnamon
50g dried mixed fruit
a little sugar for sprinkling
If you have a bread machine put the dough ingredients into
the bread tin in the order given and set the machine going on the ‘Basic: dough’
setting. When the machine stops follow the steps ** below.
If you’re making by hand, put the dry ingredients and
the egg into a large bowl, heat the butter and milk together until barely warm
then add to the bowl. Mix with a wooden spoon to form a dough then turn onto a
lightly floured surface and knead until the dough becomes smooth and silky; put
the dough back in the bowl and cover loosely with clingfilm; leave in a warm
place to prove until doubled in size then follow ** below.
** Mix the sugar and cinnamon together in a small bowl. Roll the dough into a rough rectangle about 30cm x 20cm,
brush generously with melted butter then scatter over the cinnamon sugar and dried fruit.
Roll up tightly, like a swiss roll, from a long side then cut into 9 equal
slices.
Put the slices, cut side up, in a 22cm square greased cake tin;
cover loosely with clingfilm and leave to prove again until doubled in size.
Bake at 200C for 12-15 minutes until golden then
sprinkle with a little sugar and cool on a wire rack.
Saturday, 25 August 2012
Moist Fruity Tea Bread
While Mr Simply Veg was trying to beat my new laptop (which
I still don’t like!) into submission last week I had a poke around in some of
my old handwritten notebooks; they’re full of recipes that I’ve picked up over
the years from various sources. Some of them are from magazines and some from
friends and family that I’ve scribbled down on a piece of paper and then transferred
to my notebooks at a later date. I have to confess I’ve never actually made
most of the recipes, but they made good reading.
It’s a Bank Holiday weekend here and raining, unsurprisingly, so it seemed like a good time to bake a little something and resurrect one of the old recipes. This is one that I used to regularly make years ago (when I say ‘years ago’, I mean about 25; blimey, I’m getting old!) but it obviously fell by the wayside for some reason. It would be nice if I could credit the person this recipe came from, but that seems to have been lost in the mists of time and the crevices of my memory.

45 0gm mixed dried fruit
250ml hot tea (without milk!)
100g unsalted very soft butter
1 tbsp marmalade
2 eggs, beaten
175g light brown sugar
450g self-raising flour
½ tsp ground nutmeg
1 tsp ground cinnamon
It’s a Bank Holiday weekend here and raining, unsurprisingly, so it seemed like a good time to bake a little something and resurrect one of the old recipes. This is one that I used to regularly make years ago (when I say ‘years ago’, I mean about 25; blimey, I’m getting old!) but it obviously fell by the wayside for some reason. It would be nice if I could credit the person this recipe came from, but that seems to have been lost in the mists of time and the crevices of my memory.
In my notebook it says serve this tea bread thickly sliced
and buttered; I feel butter is a bit over the top, it’s nice and moist from the
tea-soaked fruit, but it’s up to you.
By the way, if you’ve got odd bits and pieces of dried fruit
in the pantry this is the recipe to use them up. I used just over 300gm of
mixed fruit and made it up to 450gm with half a tub of mixed peel and the
remains of a bag of dried cranberries. As I’ve said before…waste not, want not.
250ml hot tea (without milk!)
100g unsalted very soft butter
1 tbsp marmalade
2 eggs, beaten
175g light brown sugar
450g self-raising flour
½ tsp ground nutmeg
1 tsp ground cinnamon
Put the fruit in a large bowl and pour over the hot tea, mix
well, cover and leave to steep overnight.
Next day, put the butter, marmalade, sugar and eggs into a
large bowl and mix well together with a wooden spoon; add the flour and spices
plus the fruit and any tea that hasn’t been absorbed. Mix well, and turn into a
2lb loaf tin lined with baking parchment.
Bake at 160C for 1¼ - 1½ hours and cool on a wire rack.
Friday, 15 June 2012
Easy Buttermilk Scones
I only started making scones successfully last year after a
lifetime of trying and failing but there’s no stopping me now – I can rattle off a
batch of scones at the drop of a hat! One thing, however, has been bugging me:
after stamping out the scones with a cutter you have to bring the dough
together again and cut out another couple to finish up the dough – well, those last
couple of scones are never as light and fluffy as the first ones. I needed to
work out an answer to this conundrum….
a little sugar for sprinkling
Well, Mr Simply Veg and I were reminiscing the other day about
corner shops (remember those?) that used to be near our homes when we were children (about a
million years ago!) – he mentioned a shop he knew that was like Arkwright’s on ‘Open
All Hours’ and I remembered a bakery where we used to buy warm Hot X Buns on
Good Fridays…are you still with me? It came to me from the deep recesses of my memory that said bakery used to sell
wedge shaped scones, presumably in order to avoid wasting any dough. There you have it, I found my answer – it’s scone wedges for me from now on!
It doesn’t answer the question, though, of why almost every recipe
I have ever seen tells you to make round scones…it’ll just have to remain another one of life’s
impenetrables.
225g self-raising flour
1 tsp baking powder
50g unsalted butter
50g caster sugar
125ml buttermilk, approx
a little sugar for sprinkling
Sift the flour and baking powder together in a large bowl;
rub in the butter until the mixture resembles fine breadcrumbs. Stir in the
sugar then mix in enough buttermilk to give you a soft but not sticky dough (I
usually add 125ml then see how it feels and add another couple of teaspoonsful if it
needs it).
Knead the dough very lightly then pat it out with your
fingers on a lightly floured surface to a circle about 3cm deep.
Using a very sharp knife cut the dough into eight segments
and transfer to a baking sheet. Sprinkle with a little sugar.
Bake at 200C for about 12 minutes. If the scones cosy up
together a bit while they’re cooking, just pull them apart whilst they’re still
warm.
Serve warm with plenty of butter, cream or jam (or possibly
all three!)
Makes 8
Tuesday, 21 February 2012
Scotch Pancakes
It’s Pancake Day today and these little Scotch Pancakes are my contribution to the proceedings. I remember making these years ago when I was still at school, although we called them Drop Scones. I must confess, the ones I made at the age of thirteen resembled rather rubbery drinks mats and, as I recall, they tasted like drinks mats too! Thankfully, I've improved a lot since those days.
I know these don’t look like the usual sort of pancakes but I’m not too keen on the ‘lemon and sugar’ type so we had these as a substitute. They were very nice as a little mid-afternoon filler and they were so quick to make you can almost do them while the kettle boils. I used a heavy frying pan to cook them but if you have a flat griddle it will be even quicker because you’ll be able to cook more at a time.
120g self-raising flour
pinch of baking powder
30g golden caster sugar
1 large egg
100ml milk
small amount of butter for greasing
butter and jam to serve
Put all the dry ingredients into a large jug; add the egg and milk and mix to a smooth thick batter.
Heat a flat griddle or frying pan over a medium heat and grease the pan with a little butter, wipe the excess from the pan with kitchen paper so that just a thin film remains.
Pour one-two tablespoons of batter per pancake in the pan and cook until small bubbles form and start to pop. Turn them over and cook for another minute or two on the other side.
Grease the pan again and cook more pancakes until all the batter is used up. I made ten of these little beauties. Serve whilst just warm with plenty of butter and jam (and a mug of tea!)
Best eaten the same day they’re made.
Monday, 19 December 2011
Decorated Christmas Cake
Here we are…the finished article! As you can see, I decorated my Christmas cake at the weekend and, though I say it myself, I think it looks pretty good.
I’m not very good at Royal icing; in fact, I don't think I've flat iced a cake in my life. (I can do you a rough snow-scene with the obligatory plastic robin to complete the effect, though!) I don’t much like ready-to-roll fondant type icing, it always reminds me of children’s playdoh in both appearance and taste, so I went for a layer of marzipan with a topping of nuts and apricots with an apricot and brandy glaze; easy but effective.
a little icing sugar
3 tbsp apricot jam
1 tbsp brandy
soft dried apricots
whole brazils
whole pecans or walnuts
ribbon
Make the glaze by heating the jam and brandy gently in a small pan until the jam melts, then rub the mixture through a sieve with the back of a spoon. Using a pastry brush, paint the top of your cake generously with the glaze; roll out the marzipan to a depth of about 0.5cm on a surface lightly dusted with icing sugar and cut to size using the base of your cake tin as a guide. Lay the marzipan on top of the cake and brush with more glaze.
Arrange the fruit and nuts on the marzipan, pressing them in lightly (I’m sure you’ll be more artistic than me!) and brush again with the apricot glaze.
Tie a ribbon around the outside of the cake, stand back and feel dead chuffed with yourself!
Store in an airtight tin until needed.
Sunday, 11 December 2011
Vanilla Shortbread
I felt like making a little smackerel of something (as Winnie the Pooh might say!) this morning; the Christmas decorations are up, the lights were twinkling and I was feeling quite festive.
I saw this Good Food recipe on the net and thought it looked interesting. Quite a lot of shortbread recipes seem to have ground rice as one of the ingredients, but I really don’t like the gritty texture it gives, hence the reason I’ve never bothered making it before; this one, however, is rice free and very simple.
I rolled some of the dough out and made a few dinky little stars for us to have with a cuppa; the rest of the dough is wrapped in cling-film in the fridge so we can have some freshly baked biscuits every day next week.
“Freshly baked biscuits every day…” I ask you, now does that make me sound like a Domestic Goddess or what?!
Saturday, 26 November 2011
Mince Pies
If you’ve read this blog before you will know that I am completely unable to make pastry. It’s not that I haven’t tried, it’s just that it doesn’t work for me….So why, you may ask, did I find myself standing in the kitchen this afternoon having yet another try at this seemingly impossible task?
Well, I was flicking through a couple of my old Christmas recipe books, which haven’t seen the light of day for about 20 years, when I came across one by Nanette Newman (!) which was published in 1984! Don’t ask…I have no idea why I bought it, but it probably seemed like a good idea at the time; anyway, there was a recipe in there for mince pies with this amazing sounding orange and almond pastry. I’m a fool to myself but, with much trepidation, I decided to give it a go.
I am astonished and very pleased to report that not only were the pies edible, they were really good! I think it had something to do with the pastry being more like shortbread than shortcrust. It didn’t mind my heavy handedness and it even put up with having the trimmings re-rolled. Result! Eat your heart out Heston, mine tasted better than yours!
I’ve reproduced the ingredients list here but I’ve had to re-write the instructions in my own words for copyright reasons, which is just as well, really, because I used a food processor and Nanette allegedly made the pastry by hand. No chance of me doing that; I've failed too many times before!
275g plain flour
25g ground almonds
175g butter, chilled and diced
75g icing sugar, sifted
grated zest of ½ an orange
1 egg yolk
3-4 tbsps of orange juice
450g mincemeat
a little milk
Put the flour, ground almonds and butter in a food processor and pulse until the mixture resembles fine breadcrumbs; add the icing sugar and orange zest then pulse again briefly; mix the orange juice and egg yolk together, add it to the mix and pulse until the mixture forms large clumps.
Tip out onto a lightly floured surface and knead lightly just until it comes together; wrap in cling-film and refrigerate for 20-30 minutes.
Roll the pastry out to the thickness of a £1 coin on a lightly floured surface and stamp out circles for the pie bases; lightly knead the trimmings into a ball, re-roll, and stamp out smaller circles for the lids. Press the bases into a bun tin, put a heaped teaspoon of mincemeat in each then press on the lids. Brush with milk and make a couple of slits in the top with a sharp knife.
Bake at 190C fan for 15 minutes until golden and sprinkle with sifted icing sugar before serving.
I made 21 pies from this, but I think you could probably get the full two dozen if you're braver than me and you roll the pastry a little more thinly.
Lovely served warm and if you happen to have a small spoonful of brandy butter to hand to tuck under the lid, so much the better.
Sunday, 20 November 2011
Christmas Cake II
It’s ‘Stir-up Sunday’ today, the day when people traditionally make their Christmas puddings; we’re not having the usual sort of pud so, instead, I made my Christmas cake.
(I've just noticed that the whole hazelnuts look like little pebbles on the surface of the cake; too bad, no-one will see them when the marzipan is in place!)
Last year I made Nigel Slater’s small fruit cake; it was really nice, good texture and lighter than most rich fruit cakes I’ve tasted. However, we both agreed that a larger cake was needed to last the two of us through December, so I have to confess I’ve fiddled with the recipe a bit and I’ve also scaled it up somewhat to make an 18cm square cake.
I don’t really have a sweet tooth, but I do like a piece of cake with a cuppa of a winter’s afternoon. If I can combine it with a bit of present wrapping and maybe a Christmas song or two on the radio, so much the better!
675g mixed dried fruit (along with the usual vine fruits I included some dried cranberries, chopped preserved ginger and chopped dried apricots)
3 tbsp brandy
2 tbsp Cointreau
grated zest and juice of an orange
190g unsalted butter
100g light muscovado sugar
90g dark muscovado sugar
3 large eggs
100g whole hazelnuts
60g ground almonds
190g plain flour
1 level tsp baking powder
½ tsp ground cinnamon
½ tsp ground nutmeg
brandy for feeding the cake
an 18cm square cake tin or a 20 cm round tin if you prefer
Put the dried fruit into a bowl, pour over the brandy and Cointreau, then add the zest and juice of the orange. Stir the fruit well to coat it in the alcohol, cover, and set aside overnight.
Next day, line the cake tin with a double layer of non-stick baking parchment allowing the paper to come 5cm above the rim of the tin.
Turn the oven on to 160C.
Beat the butter and sugars with an electric hand mixer until light and fluffy. Whisk the eggs in a small bowl and add them, a little at a time, to the creamed butter and sugar, beating well after each addition. Add the dried fruit, ground almonds and whole hazelnuts, stirring them in well with a large spoon (don’t use the mixer now, it’ll break up the fruit).
Sift the flour with the baking powder and spices then stir it into the cake mixture, a heaped tablespoon at a time.
Spoon the mixture into the lined cake tin then bake for exactly one hour without opening the door. Turn the temperature down to 150C, quickly place a double sheet of baking paper over the top of the cake and continue cooking for a further 1½ hours.
Test by inserting a skewer into the centre of the cake, it should slide out cleanly, if it looks a bit damp or sticky give it another ten minutes in the oven and test again with a clean skewer.
Let it cool in its tin and, when it’s cold, wrap the cake and its paper in another layer of baking paper and store in an airtight tin in a cool place. Feed it with a little brandy every week till you’re ready to decorate it.
I think I'll do the same as I did last year: no icing, just a layer of marzipan topped with nuts and dried fruits with an apricot and brandy glaze.
Let it cool in its tin and, when it’s cold, wrap the cake and its paper in another layer of baking paper and store in an airtight tin in a cool place. Feed it with a little brandy every week till you’re ready to decorate it.
I think I'll do the same as I did last year: no icing, just a layer of marzipan topped with nuts and dried fruits with an apricot and brandy glaze.
Sunday, 30 October 2011
Apple and Treacle Scones
Just a quick post and I promise this is my last word on scones….for a little while, anyway!
Bit of a strange recipe, this, and something of a misnomer. There isn’t any treacle in at all; it’s Golden Syrup! These are the ones I served with the spiced apple butter in the previous post last weekend; they were lovely and I’d definitely make them again but I have a feeling that instead of Golden Syrup, which adds sweetness but not much flavour, they’d be better with the addition of Maple Syrup.
I think I can feel another baking session coming on….!
This recipe was originally from Sainsbury's website - then it disappeared only to reappear on their magazine website; I've been following this damn recipe all over the place! Here's the link to it - let's hope it doesn't disappear again... although this time I've done a bit of cutting and pasting and I now have it in a safe place.
Update 31/08/20
Well, the recipe's disappeared again from the Sains website! But, as I said, thankfully I'd done a bit of cut and paste so here it is...
Now, let this be an end to it - no disappearing this time!
1 large egg
125ml buttermilk
2 tablespoons golden syrup
450g plain flour
4 rounded teaspoons baking powder
½ teaspoon ground cinnamon
100g butter, cut into pieces
300g Cox’s or Bramley apples, peeled and coarsely grated
Demerara sugar, for sprinkling
1. Preheat the oven to 220°C, fan 200°C, gas 7. Whisk the egg, buttermilk and golden syrup together in a small jug.
2. Sift the flour, baking powder and cinnamon into a large mixing bowl and stir in a pinch of salt.
3. Scatter over the butter and rub it into the flour with your fingers. Stir in the grated apple and half the egg mixture. Add as much of the remaining egg mixture as needed to form the mixture into a soft ball. Set the rest aside.
4. Tip the dough on to a lightly floured surface. Pat it out until it’s 2.5cm thick, then using a 5cm cutter, stamp out the scones – you’ll need to reform the dough to stamp them all out.
5. Transfer to a baking sheet that’s been lightly greased and dusted with flour. Brush any leftover egg mixture over the tops of the scones and generously sprinkle each with demerara sugar.
6. Bake for 12-15 minutes or until risen and lightly golden, then cool on a wire rack. Sandwich together with jam and clotted cream, to serve.
This recipe was originally from Sainsbury's website - then it disappeared only to reappear on their magazine website; I've been following this damn recipe all over the place! Here's the link to it - let's hope it doesn't disappear again... although this time I've done a bit of cutting and pasting and I now have it in a safe place.
Update 31/08/20
Well, the recipe's disappeared again from the Sains website! But, as I said, thankfully I'd done a bit of cut and paste so here it is...
Now, let this be an end to it - no disappearing this time!
1 large egg
125ml buttermilk
2 tablespoons golden syrup
450g plain flour
4 rounded teaspoons baking powder
½ teaspoon ground cinnamon
100g butter, cut into pieces
300g Cox’s or Bramley apples, peeled and coarsely grated
Demerara sugar, for sprinkling
1. Preheat the oven to 220°C, fan 200°C, gas 7. Whisk the egg, buttermilk and golden syrup together in a small jug.
2. Sift the flour, baking powder and cinnamon into a large mixing bowl and stir in a pinch of salt.
3. Scatter over the butter and rub it into the flour with your fingers. Stir in the grated apple and half the egg mixture. Add as much of the remaining egg mixture as needed to form the mixture into a soft ball. Set the rest aside.
4. Tip the dough on to a lightly floured surface. Pat it out until it’s 2.5cm thick, then using a 5cm cutter, stamp out the scones – you’ll need to reform the dough to stamp them all out.
5. Transfer to a baking sheet that’s been lightly greased and dusted with flour. Brush any leftover egg mixture over the tops of the scones and generously sprinkle each with demerara sugar.
6. Bake for 12-15 minutes or until risen and lightly golden, then cool on a wire rack. Sandwich together with jam and clotted cream, to serve.
Tuesday, 4 October 2011
Cheese Scones
Well, I’ve finally done it…I’ve made some scones that are actually edible! I am so chuffed with myself! They probably wouldn't win a prize at a village fete but they are the best ones I have ever made.
Scones are one of those things that other people always seem to whip up effortlessly at the drop of a hat. Other people….but, sadly, not me! My scones have always been flat, or dry, or as hard as a rock….or sometimes all three! I’ve not attempted making them for some years now but I was inspired to have one more try after seeing a recipe on the now defunct BBC Food Q & A; big thank you to forum member Saffiewalks. It looked very simple and easy so, with some trepidation, I thought I’d give it a go.
Astonishingly, the recipe worked! They weren't flat, hard and dry, they were light, fluffy and lovely. Well, you could have knocked me down with a cricket bat!
The husband said if he’d been served scones like this in a National Trust tearoom he’d have been a very happy bunny; high praise indeed, given that the best cheese scones I have ever had were at Bateman's, a favourite place of ours when we lived nearby on the Kent/ E. Sussex border.
(Word of advice if you happen to be going to Bateman's; arrive at opening time and head straight for the stables tearoom while their freshly baked scones are still warm; I promise you won't be disappointed!)
Now I’ve managed to make scones once, perhaps I’ll make a fruity version next time, or plain ones to have with some homemade jam. I can't wait to experiment!
8oz self-raising flour
1 tsp baking powder
2oz butter
5 oz grated mature cheddar
125ml buttermilk (approx)
1 tbsp chopped chives
Rub butter into flour and baking powder then stir in the chives and 4 oz of the cheese; stir in buttermilk gradually until you have a medium wet dough.
You can leave out the chives and sift in 1/2 teaspoon dried mustard powder with the flour. The main thing is to handle the dough as little as possible and get the scones into the oven as soon as you can after you have added the liquid.
Makes 6 - 8 scones.
8oz self-raising flour
1 tsp baking powder
2oz butter
5 oz grated mature cheddar
125ml buttermilk (approx)
1 tbsp chopped chives
Rub butter into flour and baking powder then stir in the chives and 4 oz of the cheese; stir in buttermilk gradually until you have a medium wet dough.
Pat the dough out on a floured board until it's about 3cm thick, cut
into rounds and put on a baking tray. Sprinkle the rest of the grated cheese on top of
the scones. Cook for 12 - 15 minutes in a hot oven – 200C fan; cool on a wire rack.
You can leave out the chives and sift in 1/2 teaspoon dried mustard powder with the flour. The main thing is to handle the dough as little as possible and get the scones into the oven as soon as you can after you have added the liquid.
Makes 6 - 8 scones.
Monday, 29 August 2011
Mincemeat Loaf Cake
I was having a tidy-up in the pantry the other day, trying to make some room for the chutneys that I'll be making over the next few weeks and, given that I shall also be making my Christmas mincemeat soon, I thought I’d better use up the last jar of the 2010 vintage which was lurking on the top shelf. (Good Grief! I just mentioned the ‘C’ word and it’s still only August!!) As a bonus I also found half a bag of pecans that was looking for a good home.
Because I don’t bake very much I don’t have a lot of cake tins and I couldn’t find a single recipe on the net which fitted any of the tins I have. I ended up adjusting a generic ‘Fruit Cake’ recipe, baked it in a loaf tin, and hoped for the best!
It turned out quite well, as it happens. OK, as cakes go, it won’t win any beauty competitions, but I think the flavour of the well-matured mincemeat plus a handful of chopped pecans more than makes up for any deficiencies in the looks department!
125g golden caster sugar
3 eggs
225g self-raising flour
½ tsp baking powder
300g mincemeat
50g chopped pecans
1 tsp of granulated sugar
Put the butter, sugar, eggs, flour and baking powder into a large bowl and mix well with an electric mixer. Add the mincemeat and pecans then mix well with a wooden spoon so that you don’t break up the fruit and nuts too much. Turn the mixture into a 2lb loaf tin lined with baking parchment, sprinkle the top with a teaspoonful of sugar and bake at 160C for 1¼ - 1½ hours.
Cool on a wire rack and store in an airtight tin.
Monday, 11 July 2011
Banana Bread
This is a really lovely banana bread which I had nothing whatsoever to do with; my nephew made it and brought it with him when he came for lunch yesterday.
It’s moist, flavourful and spicy; it's also much darker and richer than the banana bread I usually make, from St Delia’s Complete Cookery Course, circa 1984 (!) I’m sure Delia will be gutted to know that she has now been cast aside like an old sock because, having prised the recipe out of him, I shall be using this one in future!
I’m reliably informed (by said nephew whose sister, my niece, now lives in Sydney ) that banana bread, lightly toasted and buttered, is a favourite breakfast in Australia . Now, why have I only just found this out? Just think of all those lost years when I could have legitimately been eating cake for breakfast! There has obviously been a serious gap in my education, this is the sort of useful information I should have known… it’s nothing short of a disgrace!
2 eggs
270g light soft brown sugar
3 over-ripe bananas, mashed
270g plain flour
1 tsp bicarbonate of soda
1 tsp baking powder
1 tsp ground ginger
1½ tsp ground cinnamon
a handful of pecans, roughly chopped (reserve 8 whole ones)
140 g melted butter
Beat the eggs and sugar together until well combined then mix in the bananas; add all the other ingredients, except the butter, and mix well; add the butter and mix to form a very soft batter.
Turn the mixture into a well-greased 2lb loaf tin, lay the whole pecans on top and bake at 180C for about 45-50 minutes until risen and cooked through. Test with a skewer and bake for a further 10 minutes if necessary.
Cool on a wire rack and store in an airtight tin.
Update: 12/7/11
I am happy to report that toasted banana bread with a little unsalted butter and some homemade marmalade is an absolutely scrummy breakfast! Well, I had to try it, didn’t I - it would have been rude not to!
Update: 12/7/11
I am happy to report that toasted banana bread with a little unsalted butter and some homemade marmalade is an absolutely scrummy breakfast! Well, I had to try it, didn’t I - it would have been rude not to!
Sunday, 1 May 2011
Maple Pecan Flapjacks
I know some people make cake every week, for them there's always cake in the tin for visitors; I make cake about 3 or 4 times a year! It’s not that I don’t like it, the problem is I do like it and my weight is quite enough of an issue as it is! I also like the actual ‘making’ of cake; all the measuring and mixing, plus the wonderful smells emanating from the kitchen, is very satisfying.
Mooching about on the net the other day I saw a recipe for Cranberry and White Chocolate flapjacks, which set me thinking about baking. Needless to say I had no white chocolate or cranberries in the pantry so I improvised with what I had to hand; the result was a moist chewy confection that's incredibly moreish.
I won’t try to pretend that these are even remotely 'healthy' or 'good for you' despite their rustic wholesome appearance; yes, I know there are all those oats and nuts, but there is also all that butter and sugar! But who wants 'low-fat' where cake is concerned?! Everyone deserves a treat once in a while; a little of what you fancy does you good in my opinion and anyway, I have a cunning way of getting round the issue of having such tempting morsels in the house – I take them round to my son and daughter-in-law….simples!
200g unsalted butter
150g golden granulated sugar
80g golden syrup
40ml maple syrup**
150g pecan nuts, chopped
350g rolled oats
Melt the butter, sugar and both syrups gently together in a very large saucepan, stirring over a low heat just until the sugar melts. Do NOT allow the mixture to boil or you’ll have a panful of toffee! Take off the heat and stir in the oats and chopped nuts. Mix really well until all the oats are completely amalgamated with the delicious gooey, buttery mixture.
Press the flapjack mix into a 20cm x 30cm x 2cm tin lined with baking parchment and bake at 180C for 25 mins. Mark into squares whilst still warm but don’t remove from the tin until they’re completely cold. Store in an airtight tin.
Makes 15-20 squares.
**Please use pure Maple Syrup for this recipe - I know it's expensive, but you really need the intense flavour. The much cheaper 'Maple flavoured' stuff is ghastly and just won't do.
Mooching about on the net the other day I saw a recipe for Cranberry and White Chocolate flapjacks, which set me thinking about baking. Needless to say I had no white chocolate or cranberries in the pantry so I improvised with what I had to hand; the result was a moist chewy confection that's incredibly moreish.
I won’t try to pretend that these are even remotely 'healthy' or 'good for you' despite their rustic wholesome appearance; yes, I know there are all those oats and nuts, but there is also all that butter and sugar! But who wants 'low-fat' where cake is concerned?! Everyone deserves a treat once in a while; a little of what you fancy does you good in my opinion and anyway, I have a cunning way of getting round the issue of having such tempting morsels in the house – I take them round to my son and daughter-in-law….simples!
200g unsalted butter
150g golden granulated sugar
80g golden syrup
40ml maple syrup**
150g pecan nuts, chopped
350g rolled oats
Melt the butter, sugar and both syrups gently together in a very large saucepan, stirring over a low heat just until the sugar melts. Do NOT allow the mixture to boil or you’ll have a panful of toffee! Take off the heat and stir in the oats and chopped nuts. Mix really well until all the oats are completely amalgamated with the delicious gooey, buttery mixture.
Press the flapjack mix into a 20cm x 30cm x 2cm tin lined with baking parchment and bake at 180C for 25 mins. Mark into squares whilst still warm but don’t remove from the tin until they’re completely cold. Store in an airtight tin.
Makes 15-20 squares.
**Please use pure Maple Syrup for this recipe - I know it's expensive, but you really need the intense flavour. The much cheaper 'Maple flavoured' stuff is ghastly and just won't do.
Thursday, 3 March 2011
Welsh Cakes
I'm late; Tuesday March 1st was St David’s day so I should really have made these cakes then. I’m not Welsh, but we once lived in North Wales for a few years and I'm shameless enough to use any excuse for a little treat!
Having said that I’m not Welsh, this recipe most definitely is; it comes from a lady who was born, lived her whole life and died, in a small Welsh mining village: my husband’s Grandmother, Jane. Sadly, she’s been dead now for a number of years but she was a really lovely lady. She brought up a family of six children in a three bedroom miners’ cottage and cooked every meal on a Victorian coal-fired range, although she had a perfectly good electric cooker which was in pristine condition because she never used it!
I hope she’d be pleased at my effort at making her recipe, although I think she’d probably say they needed more spice. I’ll try to get it right next time.
8oz self-raising flour
4oz butter
3oz caster sugar
½ tsp mixed spice
3oz dried fruit
1 large egg
extra caster sugar for dusting
Rub butter into flour, sugar and spice, add fruit then add the egg and mix to a dough. Add a drop of milk if needed.
Roll out dough to ¼ inch thick and cut into rounds with a 2 inch cutter. Grease a heavy frying pan and cook for 3-4 minutes each side. Dust thickly with caster sugar while still warm.
The original recipe was in ounces and I haven’t made any attempt to convert it; if it was good enough for her, it’s good enough for me. I don’t think milligrams had been invented when Jane first started making these!
Having said that I’m not Welsh, this recipe most definitely is; it comes from a lady who was born, lived her whole life and died, in a small Welsh mining village: my husband’s Grandmother, Jane. Sadly, she’s been dead now for a number of years but she was a really lovely lady. She brought up a family of six children in a three bedroom miners’ cottage and cooked every meal on a Victorian coal-fired range, although she had a perfectly good electric cooker which was in pristine condition because she never used it!
I hope she’d be pleased at my effort at making her recipe, although I think she’d probably say they needed more spice. I’ll try to get it right next time.
8oz self-raising flour4oz butter
3oz caster sugar
½ tsp mixed spice
3oz dried fruit
1 large egg
extra caster sugar for dusting
Rub butter into flour, sugar and spice, add fruit then add the egg and mix to a dough. Add a drop of milk if needed.
Roll out dough to ¼ inch thick and cut into rounds with a 2 inch cutter. Grease a heavy frying pan and cook for 3-4 minutes each side. Dust thickly with caster sugar while still warm.
The original recipe was in ounces and I haven’t made any attempt to convert it; if it was good enough for her, it’s good enough for me. I don’t think milligrams had been invented when Jane first started making these!
Sunday, 13 February 2011
Cranberry Pecan Biscuits
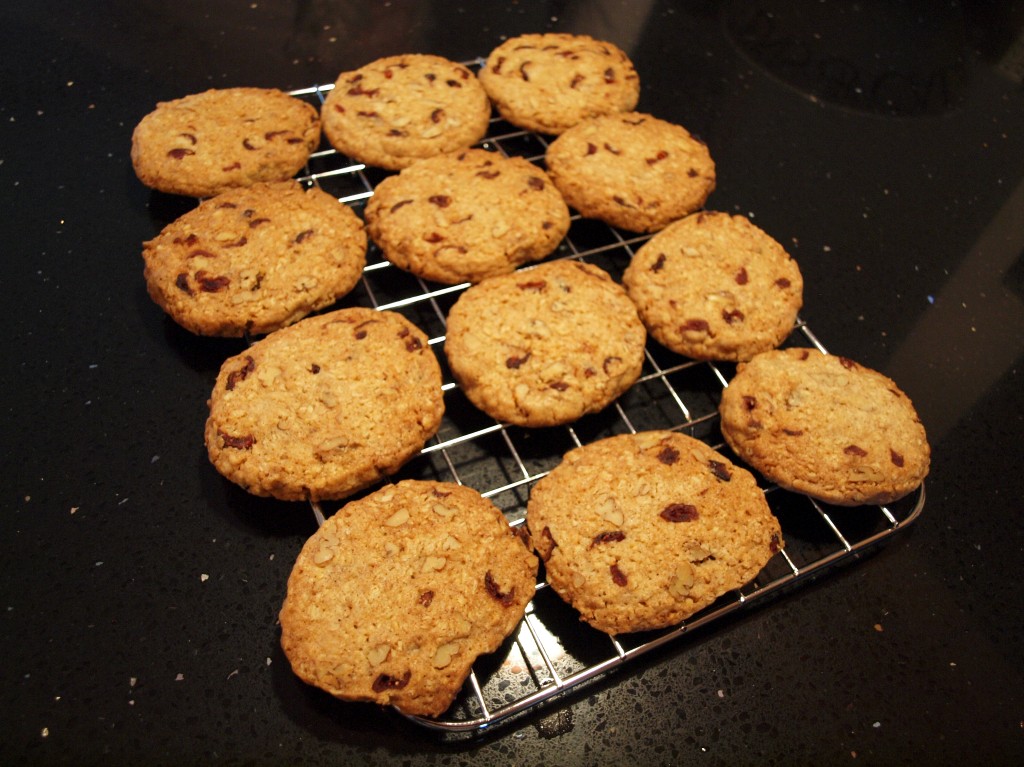
I don’t do a lot of baking and I can’t remember the last time I made biscuits. I don't even make cakes very often but biscuits seem to have passed me by completely. However, I saw this recipe the other day and it looked so easy and quick I just had to have a go. It was obviously one of those ‘meant to be’ moments because, amazingly, I had all the ingredients in the pantry already.I'm not wild about blueberries so I replaced them with cranberries, but other than that I followed the recipe exactly; I was too nervous to do my usual tweaking, in case I ended up with one big biscuit the same size as the baking sheet! Next time I make them (there will definitely be a next time!) I'll try raisin and walnut or maybe apricot and almond.
Just one point – the recipe says it makes 12, but I made 22 3-inch biscuits from this mix. God knows how big they would have been if I’d only made 12!
Give them a go, they're brilliant and really easy; actually, they'd be worth doing just for the gorgeous warm cinnamon aroma in the kitchen. It was torture waiting for them to cool down, but they were well worth waiting for.
Subscribe to:
Posts (Atom)