Search This Blog

Showing posts with label Lunches. Show all posts

Saturday, 4 August 2012

Roast Vegetable Quesadillas

It’s not been a great couple of weeks for cooking for two reasons: firstly, we’ve had a guy in doing some decorating in the sitting room and the kitchen (the entire contents of the pantry were spread across the worktops at one point; it was as much as I could do to make a sandwich for lunch!) and, secondly, I’ve been busy watching the Olympics…..well, there won’t be another Olympics in the UK in my lifetime so I thought I’d better make the most of it!

The kitchen is now back up and running again so yesterday I made some rather tasty Chilli Plum Chutney (recipe to follow) and today for lunch we had these quesadillas; nice and easy finger food to eat whilst we watched Jess Ennis and others giving their all in the quest for a gold medal.

I’ve made quesadillas before using up leftover chilli sans carne but, in the absence of any chilli, I roasted some peppers and a couple of courgettes and red onions from the garden. I find roast veg are absolutely addictive; it’s surprising any of them made it into our lunch because I was picking at them immediately they came out of the oven…! This will make more veg than you need for the quesadillas but the leftovers are brilliant with some herby couscous.

3 mixed peppers
1 large red onion
2 small courgettes
2 tbsp olive oil
¼ tsp cayenne
100g grated mature cheddar
4 soft flour tortillas
4 tbsp soured cream
2 tbsp chopped chives
few grinds black pepper
sprinkle of cayenne

Turn the oven on at 200C

Deseed the peppers and chop them into chunky pieces, cut the courgettes into thick slices on the diagonal, peel the onion and cut it into eighths through the root. Toss the veg together with the olive oil and the cayenne then put them in a shallow baking tray and roast for 20-25 minutes.

Mix the sour cream with the chives and plenty of black pepper, put into a small ramekin and sprinkle with cayenne.

Use the grated cheese, some of the roast veg and the tortillas to make two 'sandwiches'. Place each tortilla sandwich in a dry non-stick frying pan and cook over a medium heat for two or three minutes until the cheese starts to melt then flip over to cook the other side.

Cut into quarters and serve with the sour cream dip.

**You’ve probably already noticed that I’m a massive tennis fan; Andy Murray is in the singles final tomorrow against some Swiss bloke called Federer (!) Well, whilst I've been typing this Andy and Laura Robson have just booked a place in the mixed doubles - also tomorrow!! I’m so excited I can barely think straight…!**

Sunday, 22 July 2012

Greek Salad

There was something strange in the sky when we woke up this morning; it was a big round ball that seemed to be giving off a lovely warm brightness. It looked familiar but because it was so long since we’d seen it, I couldn’t be sure…is it....could it be....surely not? Yes….it is.....it’s the sun! Well, bless my boots, I think the summer’s arrived!!

I went into the garden to throw a few words of encouragement to the veg plot and was so taken aback by the unaccustomed summeriness (is that a word?) that I started thinking about lunch in the garden. Something salady was needed, obviously – a chunk of feta in the fridge caught my eye and the words “Greek Salad” popped into my head. Perfect summer food.


I’ve been making this salad for years but I feel I should confess that, having never been to Greece, I wouldn’t know an authentic Greek salad if it jumped up and slapped me so, for purists, my version could probably best be described as Greek-ish.

½ red onion, thinly sliced
2 tbsp olive oil
juice of half a lemon
½ tsp dried oregano
2 large vine ripened tomatoes
5 inch piece of cucumber
200g feta
20-25 kalamata olives
black pepper

olive oil for drizzling

Put the thinly sliced onions in a large salad bowl and mix with the olive oil, lemon juice and dried oregano; I find this short marinating takes some of the ‘sting’ out of the onions.

Chop the cucumber in half lengthways then into chunky half-moons; chop the tomatoes into chunky pieces, discarding the cores; halve the olives. Add cucumber, tomatoes and olives to the salad bowl then crumble over the feta and mix well (use your hands to avoid bruising the cuke).

Drizzle with olive oil and grind over a little black pepper before serving.  

This made enough for two with enough left over to fill a couple of wraps for lunch tomorrow.

Saturday, 7 July 2012

Lemon and Coriander Houmous

For some reason I’ve never been entirely happy with it whenever I’ve made houmous, (or should that be hummus, hummous, humous or even homous...?) it always seemed to lack a certain 'zing'.

I’m very fortunate in having an ‘outpost’ of Borough Olives at our local market where I happily spend a small fortune on tapenade, harissa, sun-dried tomatoes and, of course, gorgeous olives. Luckily for me they also sell really delicious houmous, so for the last couple of years I haven’t bothered making my own when theirs is so much better. Thing is, they don’t always have it on Tuesdays when I shop (I can’t be fagged with going shopping on a Saturday; far too many people for my liking) so last week I studied the ingredients list displayed on the stall, committed it to memory, and came home to have another go at it myself.

Well, it wasn’t half bad – no, actually, it was very good; I think I might be getting the hang of it finally. I used more oil and lemon juice than I have in the past and I think that may be where I’ve been going wrong – I also added a smidge of cumin, just to ‘warm’ it up a bit.

Lovely with a few breadsticks and some crunchy veg and, just to prove it, here's a pic of my lunch today...a nice summery type of lunch, I think you'll agree; what a pity it was raining stair-rods outside!


1 tin chickpeas, drained and rinsed
1 clove garlic, chopped
1 tbsp tahini
juice of 1 lemon
3 tbsp good olive oil
1 tbsp warm water
¼ tsp ground cumin
chopped fresh coriander to taste

a little olive oil for drizzling

Put all the ingredients, except the coriander, in a food processor and blitz until almost smooth. Add the coriander and blitz again for a few seconds.

Scoop into a serving bowl, cover and refrigerate for a couple of hours to let the flavours come together. Drizzle with olive oil before serving.

Friday, 8 June 2012

Stuffed Baguettes

This is one of those ‘it shouldn’t work…. but it does’ recipes. I saw it on the now defunct BBC Messageboard ages ago - thank you AlisonWright. It sounded interesting but I was a bit doubtful to be honest; I finally got round to giving it a go when we had my sister and brother-in-law round for a ‘kitchen-table’ type lunch a couple of weeks ago. Well, I'm happy to say, the baguettes went down a storm. The original recipe was far too meaty for my liking so a few adaptations were necessary but I kept to the basic recipe as much as possible.


They’re quite filling so you really only need a side salad to go with them or possibly some decent chutney and a few olives.

This recipe is definitely a keeper and will be making further appearances throughout the summer. Incidentally, I use the word ‘summer’ very loosely; it’s blowing a gale and throwing it down with rain here at the moment! (Don't tell anyone, but I've got the central heating on...!)

4 part-baked baguettes
1 large onion, chopped
1 tbsp olive oil
10 sun-dried tomatoes in oil, chopped
½ tsp dried oregano
200g mature cheddar cheese, grated
2 tbsp chopped chives
1 tbsp chopped parsley
4 eggs
2 tsp Dijon mustard

Fry the onion in the olive oil until softened and golden; set aside to cool. Slice the tops off the baguettes lengthways and discard then tear the bread from the centres to leave you with four canoe shapes; leave the walls of the baguettes about 1cm thick – if you make them too thin they’ll collapse when you cook them….trust me, I know! Crumble this bread into a large bowl; mix in the sun-dried tomatoes, oregano, cheese, chopped herbs and cooled fried onion. Beat the eggs with the mustard and stir into the breadcrumb mix.

Spoon this mixture into the four bread shells and place on a baking sheet, making sure they’re level.

Bake for 15-20 mins at 180C until golden.

Cut into three wedges on the diagonal before serving with salad.

Saturday, 7 January 2012

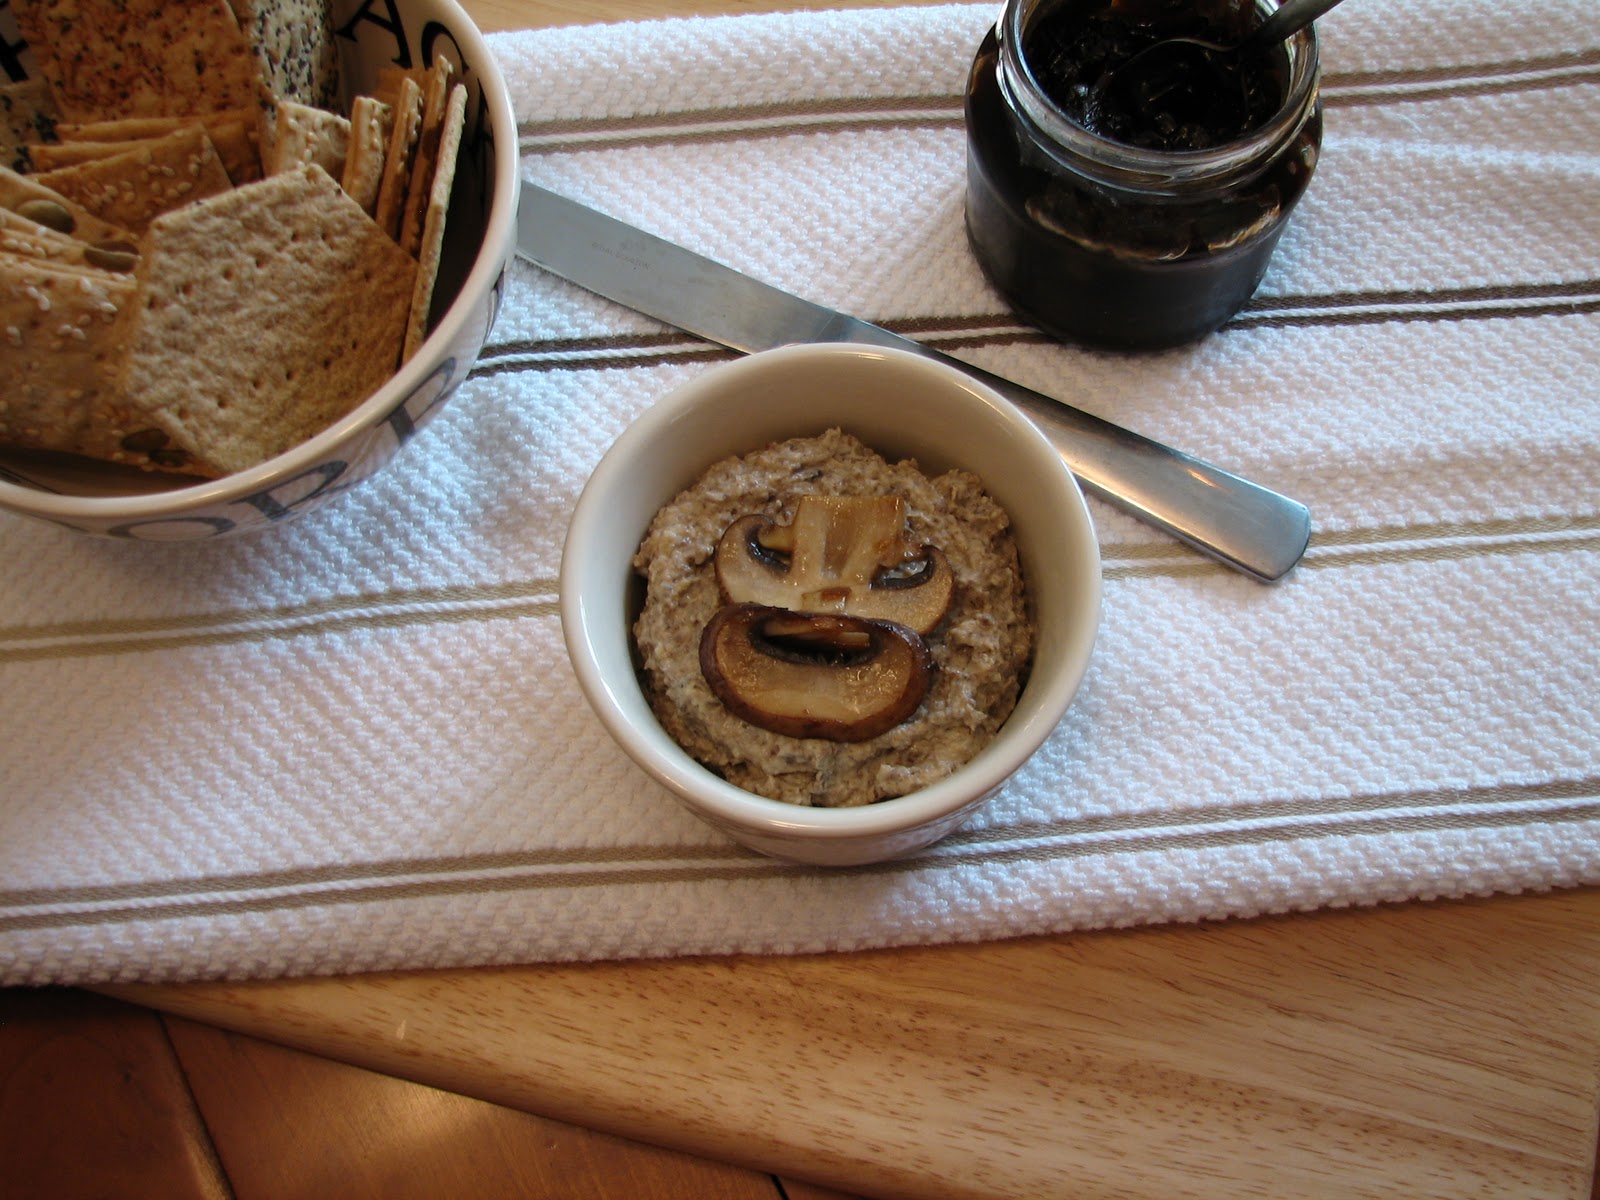
Mushroom Pâté

I was really quite pleased with this mushroom pâté, it’s one of those things that’s so easy to do but, inexplicably, I’ve always bought it (at ridiculous supermarket prices!) instead of making it.

I used ground almonds to give it texture and a bit more body and chestnut mushrooms to give a more intense flavour. It was really handy to have in the fridge over the festive period. We had some with grilled ciabatta; it was great with rocket in a sandwich and it was also nice with crackers, a few tomatoes and a dollop of red onion marmalade. Multi-talented, easy and inexpensive…what more could you want?

I have to be honest here, this isn’t the pâté I made at Christmas, it’s the one I made this morning! On Christmas Eve I took some nice pics of it on the dining table with the Christmas tree in the background, but somehow I managed to delete the images before I’d uploaded them onto my laptop. Duh…muppet! Anyway, this is such a great recipe it was a good excuse to make it again just so that I could take its picture.


50g butter, divided into two 25g pieces
1 small onion, finely chopped
250g chestnut mushrooms, sliced
1 clove garlic, chopped
100g cream cheese
25g ground almonds
2 pinches of cayenne
¼ tsp of paprika
a couple of grinds of black pepper
1 tsp brandy

a few mushroom slices sautéed in butter

Heat the first 25g of butter in a saucepan and fry the onion gently for 5 minutes; add the mushrooms, turn them in the butter, put a lid on the pan and cook gently for 15 minutes. Remove the lid and cook until almost all the liquid has bubbled away. Take off the heat, stir in the second 25g of butter and allow to cool for 15 minutes.

Put the cooled buttery mushrooms, cream cheese, ground almonds, cayenne, paprika, black pepper and brandy in the food processor and blend until smooth.

Scoop the pâté into two large or four small ramekins and top with a couple of sautéed mushroom slices. Cover and chill for at least 3 hours before serving with ciabatta, crackers, grissini or crudités.

Serves 4

Monday, 8 August 2011

Caponata

I first had this some years ago in a restaurant and absolutely fell in love with it. Amazingly, I’ve never made it myself; it’s been just one of those items on the ever-lengthening list of things that I never quite get round to….until today!

The first thing to say is that it makes quite a large quantity (which is no bad thing, let me tell you!) The recipe says it serves 6 but, as part of an antipasto platter, it would easily serve 12. The second thing to mention is, I cooked it for about twice as long as the recipe stated because I like the aubergines to be really soft and buttery.

I’m reliably informed that Caponata keeps well in a jar in the fridge with a thin layer of olive oil on the top to seal it. However, it tastes so good that I’m not sure you’ll be keeping it long enough to be bothering with that! Best eaten at room temperature, rather than fridge-cold, with plenty of fresh bread. If you want to serve it hot, it's brilliant with couscous and it can also be used as a seriously good pasta sauce.

There are umpteen recipes for Caponata on the net; I followed this one...
http://www.antonio-carluccio.com/Caponata

If it’s good enough for Antonio Carluccio, it’s good enough for me!

Saturday, 23 July 2011

Courgette and Feta Fritters

Another courgette recipe; you can tell they’re doing well in the garden this year! That's one of the things I love about ‘growing-your-own’ –  when everything starts to come to fruition at once you have to find ways of using it. Good job we love ‘em!

If you have as many courgettes as me you can freeze them; just chop them into largish chunks and pack into a Tupperware box before freezing. They’ll collapse somewhat when they’re defrosted, so I wouldn’t attempt making these fritters with them, but they’ll be perfectly OK for either of the soups I’ve posted recently.

I like fritters, they’re great hot and fresh with some new potatoes or wedges and a salad, but if you have a couple left over I can recommend them for lunch next day in a soft flour tortilla with a dollop of sour cream and some leafage with a few olives on the side. Delish!


400gm Courgettes
1 heaped tbsp plain flour
2 eggs, beaten
1tbsp finely chopped fresh herbs (thyme and chives are nice)
Grated zest of one lemon
1 clove garlic, finely chopped
1 shallot, peeled and finely chopped
100gms feta, crumbled into small pieces
2tbsps olive oil for frying

Grate the courgettes, salt lightly and leave to drain in a colander for 15 min. Meanwhile put the flour, eggs, shallot, herbs, garlic and lemon zest in a bowl and mix. Place the salted courgettes in the middle of a clean tea-towel then wring out the tea-towel** over the sink until the courgettes are almost dry. Add them to the bowl with the feta and mix well.

Heat the oil in a large frying pan and add a tablespoon of mixture for each fritter, flatten it out a bit and cook until the underside is golden, then turn and cook the other side. Put on a paper-towel lined plate while you cook the rest of the mixture.

Serve with new potatoes and a salad.

**Your tea-towel will look a bit wrecked, but it’ll be fine after a hot wash!

Sunday, 8 May 2011

Sweetcorn Fritters

I like this time of year – it's all going on in the garden; everything is growing like crazy (including the blasted weeds!) and all the newly planted veg seeds are poking their way through the soil. After a beautifully sunny day last Wednesday we had a late season frost (aarghh!!) which burned all the top leaves on the potatoes and saw off a few of my herbs. The potatoes will survive though, and I have plenty of herb seeds leftover to fill any gaps, so it wasn’t a complete disaster.

It’s been lovely weather for the past few days necessitating lots of gardening followed by lunch while we survey our handiwork. I made these sweetcorn fritters yesterday; they went down a treat as a light lunch, although they spread in the pan more than I expected and turned out quite a bit bigger than I planned. If you try them you might want them to look a little more delicate than mine appear to be!

I think I'll use the same basic recipe to make some courgette fritters later on in the summer when the garden produces its usual courgette mountain and I'm desperately trying to use them up.

50g self-raising flour
1 egg, beaten
50mls milk
200g frozen sweetcorn, defrosted
small bunch spring onions, finely chopped
2 tbsp chopped coriander leaves
Freshly ground black pepper
1-2 tbsp olive oil

Mix the flour, egg and milk in a bowl until you have a thickish batter; stir in the sweetcorn, chopped spring onions and coriander until well combined and season with plenty of black pepper.

Heat a tablespoon of oil in a large frying pan and fry tablespoons of the sweetcorn batter for about three minutes each side until golden and cooked through.

Serve with sour cream and chive dip or a tomato salsa.

Makes 6-8 fritters

Thursday, 21 April 2011

Three Tomato Bruschetta

Many years ago we used to go to a local Italian restaurant that did the best tomato and basil bruschetta I have ever tasted; it was worth going there just for the bruschetta alone! This is my best effort at recreating it and, although I've got some way to go before perfecting it, I think it was a pretty good try.

It made a perfect warm weather lunch today; a single piece with a salad garnish would also be nice as a light starter before a heavy main course. Use the best tomatoes you can get hold of for this, you really need the intense flavour. I can't wait to try it again later in the summer when our own home-grown toms, red onions and basil will be making an appearance.


10 cherry tomatoes, chopped
10 baby plum tomatoes, chopped
6 sun-dried tomatoes in olive oil, chopped
1 tbsp oil from the tomato jar
1 small red onion, finely chopped
large sprig of basil, chopped
6 smallish slices of ciabatta or sourdough
1 clove garlic, cut in half

Put all the chopped tomatoes, the oil, chopped onion and basil in a bowl, mix well then set aside while you toast the bread on both sides, in a griddle pan if you have one. Rub the toasted bread with the cut side of the garlic clove then spoon on the tomato mixture and serve at room temperature.

Serves 2

Friday, 8 April 2011

The Ultimate Club Sandwich

The husband likes club sandwiches, given half a chance he would probably live on them; I can guarantee he has had one (or more) sent up on room service at every hotel we have ever stayed in, but despite his liking for them I have never actually made one.  Last weekend I decided to remedy that by making what can only be described as The Ultimate Club; it had all the sandwich fillings we like best in one delightful stack!

I think a good sandwich is a very individual thing so I haven’t given specific amounts; use as much or as little of everything as you like and add or substitute at will.


So, working from the bottom up…

Wholemeal toast spread with mayonnaise
Shredded lettuce
Tomato
Griddled halloumi
Another slice of wholemeal toast spread with mayo on the underneath surface and spread with houmous on the top surface
Sliced avocado
Finely sliced red onion 
A final slice of wholemeal toast spread with more houmous.

Now that is what I call a sandwich!

Cut into four triangles and spear with a cocktail stick topped with an olive. Serve with crisps or chips. (I only put two triangles on the plate for the picture so the filling could be seen).

Monday, 15 November 2010

Mini Cheese & Onion Quiches


I’ve been trying to get ahead with bits and pieces of cooking for Christmas recently, so I’ve been doing a little something every couple of days. It’s not that I have masses of things to do, it’s just that I enjoy fiddling about and I like to spread the enjoyment over as long a period as possible!

Boxing Day chutney, red onion marmalade, mincemeat and cake are all sitting in the pantry, Not Sausage Rolls are in the freezer and today I made a batch of mini quiches, also for the freezer. They’re nice little bites, perfect for adding to a buffet, but also good for picnic lunches when the weather is a little less freezing!

I’ve already admitted to being rubbish at pastry, so needless to say I used ready-made; but if you’re better at pastry than me, use home made.

2 packs of ready-made shortcrust pastry
3 onions, peeled and thinly sliced
1 tbsp olive oil
100gm mature cheddar, grated
few sprigs of fresh thyme
3 eggs
200ml milk
black pepper

Saute the onions in the olive oil until very soft and lightly browned. Unroll the pastry and cut out circles to line 2 12-hole bun trays. Put a teaspoonful of the cooked onions in each pastry case, then top with a few thyme leaves and a sprinkling of grated cheddar. Whisk the eggs and milk together in a jug; fill each mini quiche almost to the top with this mixture then grind over a little black pepper.


Bake at 190C for 15 minutes until puffy and golden.

Allow to cool on a wire rack then freeze in a rigid plastic box. Reheat from frozen in a moderate oven for 10 minutes and serve warm.

Makes 24

Tuesday, 9 November 2010

'Not' Sausage Rolls


I've heard it said that people are either good at making cakes or they're good at making pastry. Well, to my shame, I have to tell you that I am completely rubbish at pastry; I've tried, believe me, but I think I'm just too heavy-handed and impatient. Pastry I've made in the past has been successfully used by the local council as paving slabs - I think you get my drift...! However, my lack of skill in the pastry department does not deter me; I just cheat and buy the ready made stuff - thank goodness for Jus-rol!

I make these little rolls every Christmas and they're brilliant, if I say so myself; the 'sausage' filling is a tweaked nut-roast recipe. I've never yet met anyone who doesn't love them - they disappear as fast as you can bake them!

They couldn't be easier to make and you can freeze them uncooked and bake as needed; I've taken to keeping a few in the freezer to whip out for a quick lunch. Served warm with some spicy chutney or a few olives, you can't go wrong; they're also nice for a summer picnic or lunchbox.

This post is especially for my lovely daughter-in-law. She knows who she is!

(Not...!) Sausage Rolls

1 large onion, chopped finely
2 tbsp olive oil
200g ground mixed nuts
100g grated mature cheddar
75g soft breadcrumbs
1 tsp paprika
1 tsp dried oregano (or any other herb you have to hand)
1 egg, beaten with 1 tbsp water
a 500g pack of ready-rolled puff pastry
a little milk

Fry the onion in the oil until softened and golden. Mix all the dry filling ingredients together in a large bowl, add the fried onion, then bind with the beaten egg and water. It may look and feel a bit dry but don't worry, it’ll be fine. Press the mixture together and roll it into three long sausage shapes. Cut the sheet of pastry into three equal strips and roll up the sausage shapes in the pastry strips, making sure that the join is underneath, dampen the edge of the pastry with a little milk and press firmly together. It'll be quite a tight fit to get all the filling in but with perseverance I usually manage it!

Cut the rolls into 3cm pieces and brush with milk, then bake on a greased baking tray at 200C for 15-20 mins. (I usually line the tin with baking parchment - it saves on washing up!)

If baking from frozen cook for 20-25 mins.